diyrebel

joined 2 years ago
MODERATOR OF
[–] diyrebel 2 points 6 months ago* (last edited 6 months ago)

There is no service manual within my reach. I would have to resort to bribery, torture, breaking and entry, and theft to get one. Thanks for the link but that only seems to cover N.American makes.

This is in fact why I am looking to probe the serial port. To try to poke around since I don’t know the secret steps to reseting the board.

[–] diyrebel 1 points 7 months ago (1 children)

I appreciate the guidance. But I think I can rule out insulation breakdown because I just removed the cover to the tacho generator and the ring magnet was broken in two pieces.

[–] diyrebel 1 points 7 months ago* (last edited 7 months ago)

i just see a blank page where an article would go. There is a giant ad at the top and typical garbage down the sides and at the bottom, but no text in the article to read.

(edit) is it just an image? I have images disabled so I wonder if that’s my issue.

[–] diyrebel 1 points 7 months ago* (last edited 7 months ago) (3 children)

Thanks for the feedback! So I guess I should buy a megger. Wow.. not cheap. I think I see these at local 2nd hand street markets. I often thought “what strange multimeter.. so few functions” but I didn’t realize what I was looking at. I will look for something that dials “500V” and has fewer modes than a multimeter, and ideally a “MΩ” printed somewhere although it looks like they won’t all print that on the device. I should probably learn how to test the megger itself so I buy something that works.

I suppose I could try to bring the motor into an appliance repair shop and pay them to test it with a megger.

As far as diagnosis of the whole machine-- suppose it’s true that I have an insulation failure. The control panel LEDs light up correctly when powered on, then when I try to start a program the start button just blinks. Does it seem viable or likely that faulty insulation would cause the controller to behave that way? I get the impression that the blinking LED means the controller detected an unspecified fault of some kind & refused to continue, which tempts me to think that the controller is functioning correctly -- unless it’s a false positive of a failure.

I really want to avoid replacing multiple major parts because I don’t imagine I can return special ordered parts.

(update) At the street market I saw something like this for €100:

https://www.tekcoplus.com/cdn/shop/products/gain-express-gainexpress-Multimeter-SM-852B-set_1024x1024.jpg?v=1553658696

which was apparently a lousy price. I also saw a megger for €160 that looked kind of like this:

https://cdn.globalso.com/hvhipot/GD3128-Series-Insulation-Resistance-Tester2.jpg

I guess that’s what I need. It’s probably a good price for what it is, but not justified for my mission.

[–] diyrebel 1 points 7 months ago* (last edited 7 months ago) (5 children)

Right but I think that safety capacitor (SC) is the last thing I care about. IIUC, I could perhaps even simply bypass the SC because it’s merely improving the power quality/safety. It’s not worth buying an SC unless I can fix whatever is broken. If I could get the machine working, I could then of course consider replacing the SC as a final protective measure -- but I’m not even sure anything is wrong with the SC.

The task at hand is testing every essential component of the washing machine, starting with the motor and tacho. I would like to understand what happened with the SC and motor though. Did I wire the motor wrong which caused the SC to flash and produce bad output for a moment? I don’t want to repeat that. I could power the motor directly without the SC, but if the motor is doing upstream damage then I guess I wouldn’t want my breaker box on the chopping block.

[–] diyrebel 1 points 7 months ago

I appreciate the explanation. Interesting to hear the term “was motor”, which I always thought of as a valve but I guess the fact that the wax moves a valve it’s sensible to call it a motor. IIUC, it’s similar to thermostatic shower mixers, but with a floor temp of 5°C.

[–] diyrebel 1 points 10 months ago* (last edited 10 months ago) (1 children)

It did not seem to struggle to spin. It seemed to have the muscle to spin with a load and water, but crapped out after ~2 seconds every time. ~~Then after trying a few programs it died harder, so nothing happens and it just blinks. I can’t even start a program now. I wonder if the motor driver board would break progressively like that.~~ (edit: I forgot to turn the water back on after hooking back up, so the condition did not deteriorate.. it’s back where it was [starts to spin then quits]).

Thanks for the tip. I try to focus on that component. I wonder if I can send raw power to a couple terminals to test the motor.

[–] diyrebel 2 points 10 months ago* (last edited 10 months ago)

I appreciate the feedback.

The rapid spin that happens in the wash cycle is with the tub full of water. It does not drain it at that time, which is bizarre. So it’s not trying to dump water. It’s a cheap Beko so I don’t suppose it would necessarily be as smart as other machines. When I forcibly cancel the program by holding the start button for 3 seconds, then it drains as part of the termination sequence. In the spin-only program I can hear the pump for a second between spin attempts, but it’s a dry tub in that test.

No matter what program I am running, it makes 4 or 5 attempts to high-speed spin the quits with a blinking start button light. But every task seems fine. Fills with water without issue, drains without issue, spin looks good until it gives up. It’s just opting to do the wrong task. I guess a sensor of some kind could be the culprit. Youtube is a piece of shit lately with Google’s protectionism but I might try to see if I can reach videos on this machine.

Beko is a popular cheap brand. Not sure about part availability yet. It’s a Beko wmd 26125 T.

Found repairportal.beko.com but it’s broken for me. Though archive.org’s 2022 copy of that site suggests they have spare parts.

[–] diyrebel 2 points 11 months ago* (last edited 11 months ago)

The pipe is rigid and not moveable, so I would still have to remove the toilet to access the pipe directly. But I don’t quite understand your theory. It flushes fast so I doubt it’s clogged, even partially. But if a clog or buildup had an odor, it’s still on the other side of the trap.

[–] diyrebel 1 points 11 months ago (2 children)

That wax seal on the floor type of installation is how US toilets are designed. In my case the drain pipe connects behind the bowl and below the cistern so the drain pipe is visible where it attaches to the toilet. I don’t get the impression there is a problem with that seal.

[–] diyrebel 2 points 11 months ago

Thanks for the insights. There is at least one place in the house where I hear glug from a different drain than the one draining. In fact after the dishwasher drains I hear glugging for a while and I think the dishwasher is upstream to the bathroom. So one theory would be the dishwasher draining is causing a trap to get vacuumed. But the toilet bowl trap is big enough that I would not think that’s the trap being cleared. I guess I have to pay more attention to these things. Maybe I should install some internal vents.

I also suspect a connection between temp changes and the odor.

[–] diyrebel 1 points 11 months ago

This is an old house with quite poor quality work all around. No drain pipes are vented.

Toilets are not like US ones. There is no wax ring that the toilets sits on top of. The pipe connects behind the bowl. Nonetheless, I guess I could remove the toilet and cap off the drain somehow and leave it that way for a couple weeks to see whether I can rule out the connection to the toilet.

I did a moving job once with a guy that had a serious gas issue and would fart in the elevator and send me eye-watering presents throughout the day as a prank. It makes me wonder if I can somehow box in the connection between the toilet and pipe, then open the box periodically to see if there’s any odor. Maybe even better if there were some kind of methane gas sensor I could put in a box. OTOH, it looks like it would be quite hard to box off the connection.

Under the sink is some quite lousy drain work. A PEX water pipe is used as a drain pipe for the boiler overflow which goes into a rubber reducer bent at such an angle that it leaves an air gap. Then that goes into a T fitting that uses packing tape to connect to the pipe under the floor. Making it proper would require removing the sink and tearing into the floor under it. I would do it if I thought it was causing the odors. I could be wrong but it when the odor is present it always seems strongest close to the toilet.
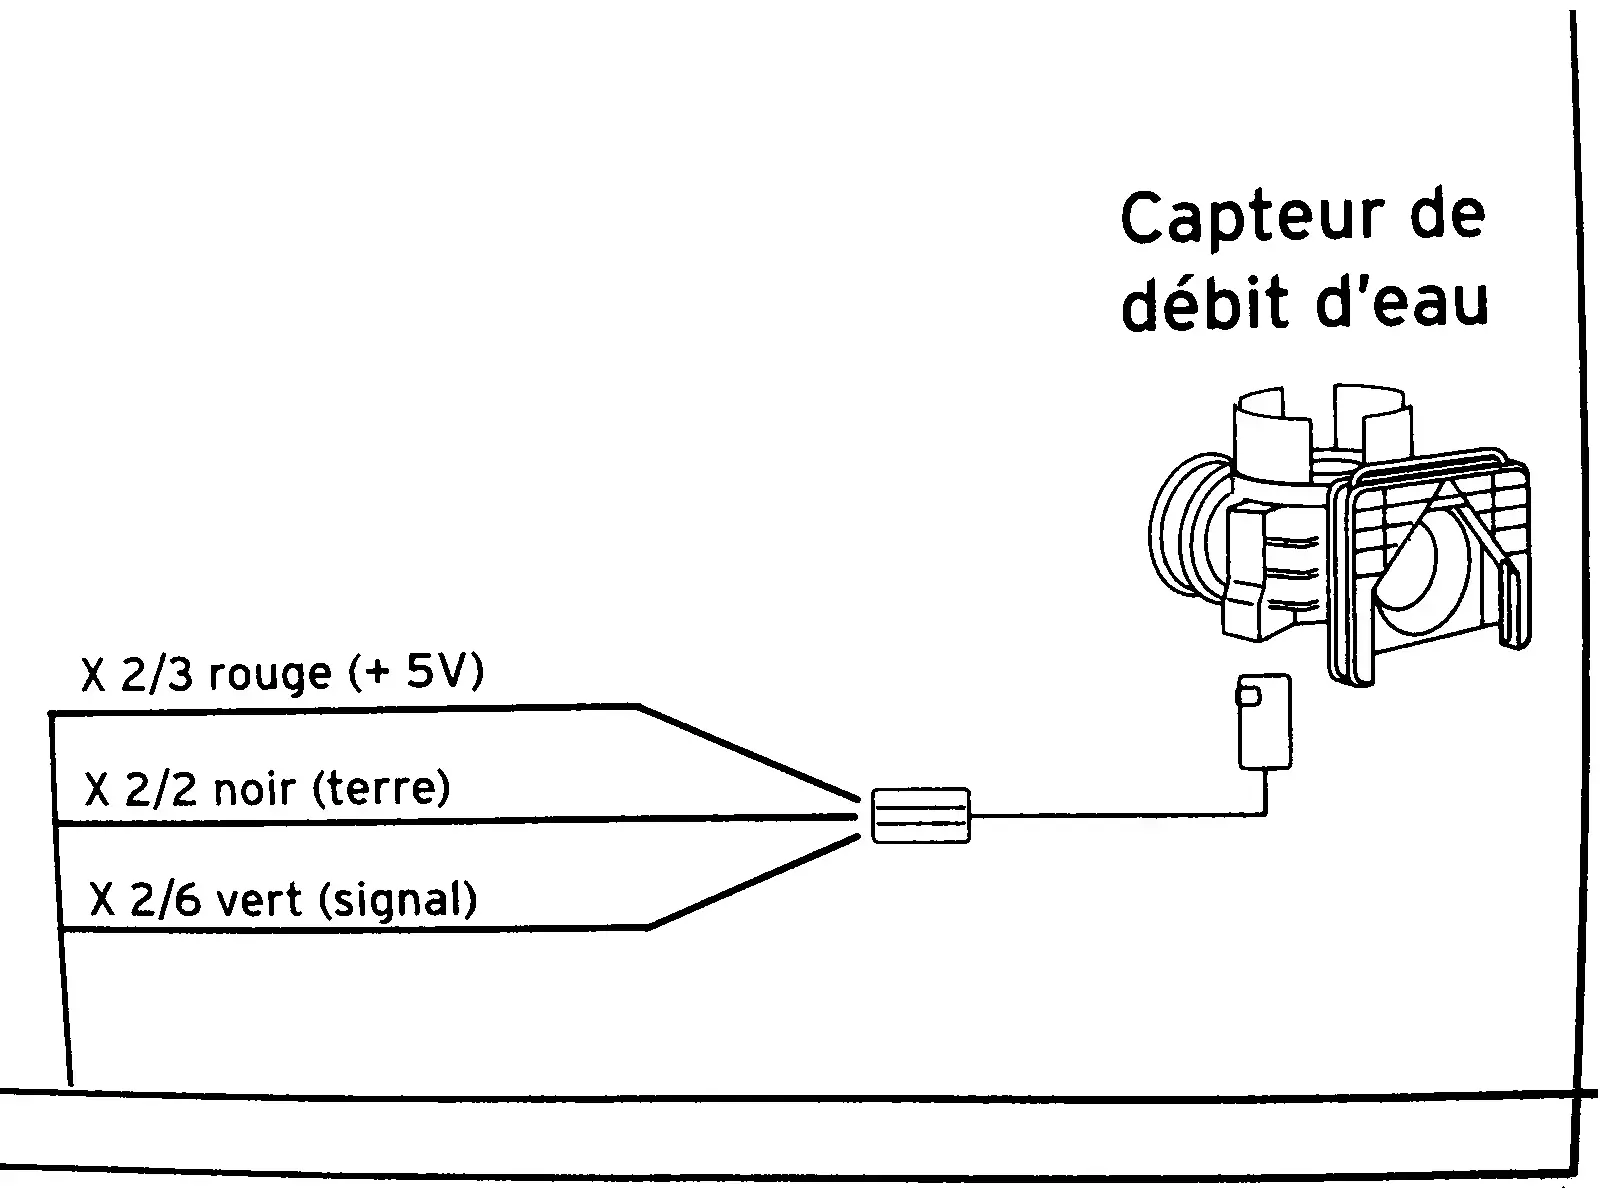
 

cross-posted from: https://lemmy.dbzer0.com/post/26703241

This diagram is from the service manual of a combi boiler. It’s a flow sensor which detects whether hot water is running, which is then used to trigger on-demand heat and switch a diverter to take radiators out of the loop.

In English, the diagram shows:

  • X ⅔ red wire (+5V)
  • X 2/2 black wire (ground)
  • X 2/6 green wire (signal)

I need to know what those fractions mean. I took the voltage measurements in this video:

I cannot necessarily trust the model in that video to have the same specs as mine. My voltmeter detected 4.68 V on the red input wire showing that the sensor is well fed. The green “signal” wire is supposed to be 0 V at rest and 2 V with water running (or I think the reverse of that is used in some models). In my case the green wire is ~1.33 V at rest and ~0.66 V when water is running. I need to know if these readings are normal as I troubleshoot this problem.

update


@[email protected] gave the right answer. Someone in another cross-post helped solve the underlying problem.


This diagram is from the service manual of a combi boiler. It’s a flow sensor which detects whether hot water is running, which is then used to trigger on-demand heat and switch a diverter to take radiators out of the loop.

In English, the diagram shows:

  • X ⅔ red wire (+5V)
  • X 2/2 black wire (ground)
  • X 2/6 green wire (signal)

I need to know what those fractions mean. I took the voltage measurements in this video:

I cannot necessarily trust the model in that video to have the same specs as mine. My voltmeter detected 4.68 V on the red input wire showing that the sensor is well fed. The green “signal” wire is supposed to be 0 V at rest and 2 V with water running (or I think the reverse of that is used in some models). In my case the green wire is ~1.33 V at rest and ~0.66 V when water is running. I need to know if these readings are normal as I troubleshoot this problem.

update


As the responders point out, the strings in the diagram represent labels for where the wires land on the motherboard. The underlying problem was also solved with the help of someone in a cross-posted thread.


I have a Vaillant ecoTech Plus combi boiler. The central heating works fine. But the hot tap water became intermittent. If I got lucky and hot water would come from the tap, it never went cold as long as it was running. So I think it’s likely a flow switch because there were times when it simply did not seem to detect that hot water was on. I heard no boiler fan and the faucet icon did not appear on the display on the times it failed to produce hot water. The moments where it would work are now history. Now it’s cold water every time. So it was a gradual manifestation.

I popped the cover off and there’s some kind of scaling or buildup of something on the pump. The clip that holds something in place above the pump is corroded. So while the system behaves as if it does not detect water use, the pump does not look good. Would a faulty pump cause my issue?

About two years ago I had an intermittent hot water problem and it turned out the secondary heat exchanger was blocked by limescale. In that case the water would go cold mid-shower. The current intermittency problem is just with the initial switching on of hot water - no interruption once it was going. So I kind of doubt the heat exchanger is my issue.

Any theories?


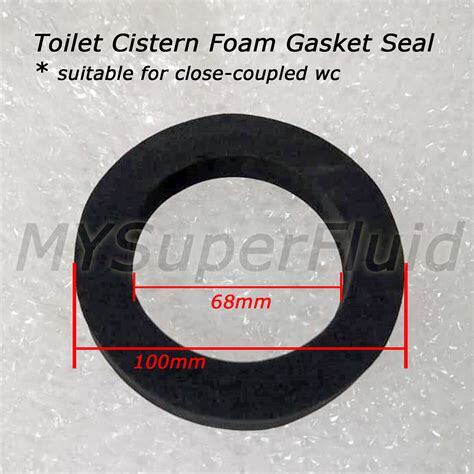
I have a plastic cistern which has started leaking, only when flushing. The cisterns in the region are installed to sit on a foam ring (~12mm thick), which serves as a gasket. The foam eventually fails. I’m baffled because failing foam looks no different than new foam. They charge €10 for these gaskets that probably shouldn’t cost more like 50¢.

I bought a new gasket and it fails as well.

One shop had some uncommon gummy play-dough-like stuff for this purpose. It comes out in a strand with about the same diameter as a sharpie marker. So I stuck that to the toilet around the cistern ingress hole. Then I put an old foam disc on top of that and pressed it down. Even that leaks. Maybe I was supposed to really pile up this gummy stuff and not use the foam ring at all.

DiY shop says “buy a new cistern for €40”. I hate that option because it rewards the same poor design and I’d be spending more than I should have to.

Fuck that.

Alternatively the standards have changed and the new design is to have a thick rubber flanged gasket. But the ceramic ingress hole in the new toilets is also 80mm (~7mm bigger than mine). So I need a whole new toilet to upgrade to the new standard. What a disaster.

Fuck that.

So I went to a rubber fabrication specialist to get the new rubber gasket design in the size of the older toilets. He does not have a 3d printer, so for the 3D thing I need will cost €1000 to build the casting mold.

Fuck that.

All pressure is on to throw away a whole functional toilet because of a failed gasket. I hope that’s the nuclear option. I’m seriously considering grinding the ingress hole of the ceramic toilet to have the ø 80mm needed to install the newer rubber gasket. Has anyone done that? I have a carbide hole saw for ø 83, which would deny me the tight fit that I need. So am I better off using a dremel with a stone bit? Seems like that will take forever and maybe be a bit error prone. Even if I make the perfect hole, the inside of the rubber flange is also bigger than the cistern output port. So then I might need to improvise something to make the cistern mate tightly with the flange.

(edit)
Another possible hack: thinking of those Victorian toilet designs where the cistern is mounted close to the ceiling with a pull chain. Those toilets still exist, I think deliberately as a retro interior design. I wonder if there is some kind of plumbing kit that would have better sealing properties, and perhaps the cistern could be just raised 10cm or so and bolted to the wall. Though if it goes wrong, the toilet could become the shower for some unfortunate user.

update: solved


I was seriously baffled. The gummy stuff seems great. I could see no way for water to pass above, through, or below the gummy stuff. The only remaining possibility was water was the flush was faster than the bowl and backing up and spilling over the foam ring. So I put a ring of paper on it and retested. Still leaked but the paper ring is dry! wtf.. no possibilities left. I spent a lot of energy on the gasket.

When I first spotted the leak, my very first suspicion was that the plastic cistern could have a fracture because I’ve had one fail in that way before. So I filled it with water and set it over a bucket. Saw no leak. Apparently I was too hasty with that test. I just tested again and there is a fracture that water is very slowly dripping through. It’s so slow I thought it could only be happening on flushes (which reinforced the false negative of my 1st test).

Anyway, the fix is just to squirt some super glue into the fracture it possible, perhaps do some plastic welding on top of that using a soldering iron and a zip tie, then maybe put a bit of flex seal tape or roofing tape on top of that.

Glad I did not take a grinder to the motherfucker. I appreciate everyone’s feedback!

update: hmm.. not so easy


I just glued and taped. Still leaks. There are 3 cracks. I think these cracks were introduced when I screwed down the cistern (plastic piece of garbage). One of the cracks spans a rail so cannot be fixed externally. The inside of the cistern has a layer of styrofoam (probably to reinforce it). So I’m ½ tempted to cut the styrofoam and squirt epoxy on the inside bottom.

Alternatively, the normal fix is to buy a new plastic cistern (price: €40). But people keep throwing away plastic cisterns simply because the internal rubber ring gets scaling buildup and they do not sell the ring. I happen to have 10 new rings. So I guess my best move is to wait until the next cistern gets thrown away.


I just visited some web galleries of bathroom remodelers in the US, and it looks uncommon to have external shower fixtures. They tend to bury as much of the fixture as possible in the wall. From the photos, I don’t get the impression they are using thermostatic mixing valves. But it’s hard to tell. Can anyone confirm or deny?

I think I might favor external fixtures because they tend to be much cheaper and also more easily servicable.

2
submitted 1 year ago* (last edited 1 year ago) by diyrebel to c/[email protected]
 

Wondering if anyone has done this.

I have converted my showers to the external style of thermostatic shower valve. Made a huge upgrade to showering UX. Why not do the same for bathroom faucets?

It seems the same benefit could be had with the bathroom faucet, but no bathroom faucets in local shops have this capability (I didn’t check online nor would I shop online). So to wash my hands (or whatever), I start with full blast hot water to get the hot water hurried along the pipes. Then of course it can get screaming hot soon enough and I have to adjust the valve in the middle of what I’m doing.

So the hack I have in mind is to install a mixer valve that is intended for showers. It can be installed under the sink with the output of that going to the hot input of the faucet. Then when I put the faucet on full hot, it opens the hot input 100% just until the preset temp is reached, at which point adjustments are made automatically and instantly. This would give warm water as quickly as possible. If I really need screaming hot water for some reason, the mixer under the sink can be put on full (although I think I have to accept that those probably still have an upper limit).

21
submitted 1 year ago* (last edited 1 year ago) by diyrebel to c/[email protected]
 

As house problems can manifest in many ways, I recall reading some basic advice “if water is ending up in the wrong place, it’s in the plumber’s domain”.

Exceptionally, if water appears on the ceiling of the top floor, I would skip the plumber and call a roofer. But what about showers?

This is a bit of a mystery:

A shower is leak is manifesting two rooms away from the shower. It’s clear that the shower is the source of the leak because water only leaks when the shower is running. The plumber claims to have fixed the drain pipework. But it still leaks, just at a very slight trickle or drip. So apparently the pipework was leaky and the fact that it’s significantly less water leaking means there is still another problem. Plumber made a 2nd visit and claims the new pipework is solid up to and including the drain, and makes a vague statement: “replace the shower pan”. When someone stands on the showerpan while showering, water leaks at a higher rate. The shower pan flexes when standing on it, which suggests that maybe the bedding is rotted wood due to the leak. We put wood planks on the shower pan to prevent the showerpan from flexing while showering. That reduces the leak. But the leak is still there. I wonder if water is hitting the outside of the drain pipe and clinging to the drain pipe due to water tension, and running along the outside of the pipe until the pipe takes a turn 2 rooms over. I can only guess.

The shower pan itself has no holes. We will redo the silicon caulking around it in case the leak is around the sides.

Anyway, I don’t want to get too far off into woods with speculation. I’m mainly just trying to work out: is the plumber competent? Are plumbers expected to accurately diagnose this sort of thing? Or are plumbers only responsible for pipework and water penetrating walls and showerpans is beyond their expertise?

It’s hard to find good plumbers and I wonder whether I should call this plumber back in the future.


I’ve never used webtor but just trying to understand how it works. Apparently it’s a Tor client running on a web server which then serves the data to web users the simple way -- correct?

Do users have to wait until the complete torrent is fetched before being able to download?

Does webtor just leech or does it seed as well? And if it just leeches, don’t others in the swarm take notice and cut webtor off?


There are a lot of mixed messages about plumbing with dissimilar metals. Mainstream local plumbing shops sell brass manifolds. They say I can connect the brass manifold to steel pipe. Copper is very dissimilar to steel, and fittings for copper are brass. So if it’s okay to connect brass to copper and brass to steel, why couldn’t a copper pipe be connected to a (steel) hot water tank simply using a brass fitting? It’s supposed to be a dielectric fitting that insulates using rubber so the metals don’t touch.

OTOH, there is a gas-fired tankless boiler with internal copper pipe and a professional directly attached those copper pipes to galvanized steel pipes. Youtubers say copper should never join steel and they show examples of corrosion.

The question at the moment is whether this is a good idea:

galvanized steel pipe → brass manifold → galvanized steel pipe

I can get brass that is nickel plated externally, or it can be simple brass. The nickel-plated manifolds have integrated PEX valves. If one valve goes bad, then the whole manifold needs to be replaced as a single piece.

Shouldn’t the manifold also be made of galvanized steel? I wonder if it’s worth it to go on a hunt for something that’s uncommon.

#askFedi


cross-posted from: https://lemmy.dbzer0.com/post/12359577

There are a few youtube videos where someone suggests using sulfuric acid to clean a secondary plate-style heat exchanger (for example). Yet I’ve heard sulfuric acid is extremely corrosive to metal, so something seems off about that advice. I certainly would not want an internal leak to cause radiator fluid to enter the tap water. I saw a drop of sulfuric acid land on a galvanized steel pipe once and within minutes it was rusted on the spot.

This guy also says sulfuric acid is an option but also says there is a safer alternative acid -- yet he did not mention what it is! Does anyone know?

This guy says he uses an ultrasonic bath but he does not say what chemicals he uses. Would distilled white vinegar be good for this?

Note these questions are very loosely related to this thread which describes a problem I am having, but really it’s a separate discussion. Secondary exchangers need periodic maintenance regardless of whether this is my current problem. I saved my previously clogged heat exchanger from a few years ago so I could work on cleaning it. I have a quite small ultrasonic I could try, but I cannot submerge the whole exchanger. I would have to stand it on end and only clean a few centimeters deep.

4
submitted 2 years ago* (last edited 2 years ago) by diyrebel to c/[email protected]
 

My #Vaillant combi-boiler was working fine for both central heating and tap water, then suddenly there is no hot tap water. These are the clues that seem to imply the secondary heat exchanger would NOT be the problem:

  • radiators heat up fine, which I think must prove the radiator side of the secondary heat exchanger is clear (OR does the secondary heat exchanger get bypassed when central heat runs)?
  • the “hot” (cold) tap water flows with good pressure, which seems to suggest the tap water side of the secondary heat exchanger is probably clear as well.
  • new secondary heat exchanger was installed in February 2019, which would be unlikely to clog this early.
  • when I last showered the hot water was good and continuous. In 2019 when an exchanger clogged shower water would alternate between hot and cold. But in the case at hand I had solid hot tap water one day and not the next.

When I turn on a hot water tap, the boiler LCD should normally show an icon of a faucet to indicate that it has switched to tap water. That is not happening. Even if I turn off the central heating by turning the dial to the lowest setting, the boiler never switches to tap.

The guy in this video says it’s normally the central heating side of the secondary heat exchanger that clogs. Does anyone concur with that? Seems unlikely because the radiator circuit runs the same water through which has inhibitor. The tap water side would have new quite hard water constantly passing through the tap side of it.

There are no fault codes displayed when I press the “i” button for information. What a likely issue?

I guess this question might be important:

  • Does the secondary heat exchanger get bypassed when central heat runs?

After some thought, I suspect bypassing the heat exchanger would be important, otherwise it would heat the tap water sitting still in the exchanger and cause unwanted pressure, correct? If that’s the case, it makes me think the radiator side of the exchanger could be clogged. But then I guess that does not explain the tap water icon not appearing on the lcd. When I turn on the tap, I hear no solenoid switching sound like I used to.

UPDATE

This morning the hot tap kind of works with the thermostat off and after letting water run quite a long time. The tap water icon appears somewhat chaotically, flashes every couple seconds (not sure if that’s normal). For the first couple minutes the status rotates between these undocumented status codes: 11, 14, 17. What do those mean?

The burner ignites for a second then quits (status 14). Like a car starting to rev but giving up.

Over the summer I drained the whole radiator system, flushed about ½ the radiators, and refilled with water and added the inhibitor. Just yesterday I added water to increase the radiator pressure. There is no filter on the radiator circuit. I wonder if my maintenance would have caused sludge to end up in the heat exchanger.

Then I turned on the heating and the tap water was shut out again. The status sequenced like this:

  1. (status 4) heating mode: burner on
  2. (status 5 undocumented)
  3. (status 7) heating mode: pump overrun
  4. (status 8) Anti cycling mode (after heating operation) ← what is that?
view more: ‹ prev next ›