1
fixing
837 readers
1 users here now
Celebrating/talking about repairing stuff, the right to repair stuff, and the intersection of tech and solarpunk ideals.
What does it mean to use what we have, including technology, to try to build a better, more environmentally just world?
founded 3 years ago
MODERATORS
2
3
4
15
Questions on how to connect a PC to a washing machine (USB→TTL serial) ← UPDATE 2: the serial port has power - but is it functional?
(lemmy.dbzer0.com)
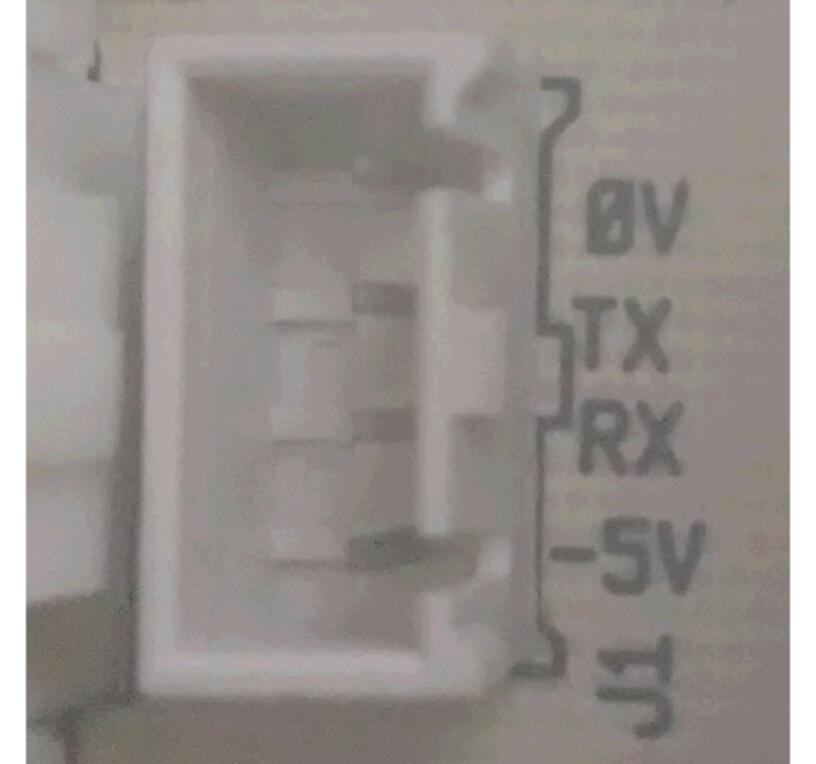
I need to connect a PC to my washing machine. The washing machine has a bank of pins labelled like this:
- 0v
- tx
- rx
- 5v
The microcontroller is an ATmega32L, which has specs for the serial connection as follows:
specs
The Universal Synchronous and Asynchronous serial Receiver and Transmitter (USART) is a
highly flexible serial communication device. The main features are:
• Full Duplex Operation (Independent Serial Receive and Transmit Registers)
• Asynchronous or Synchronous Operation
• Master or Slave Clocked Synchronous Operation
• High Resolution Baud Rate Generator
• Supports Serial Frames with 5, 6, 7, 8, or 9 Data Bits and 1 or 2 Stop Bits
• Odd or Even Parity Generation and Parity Check Supported by Hardware
• Data OverRun Detection
• Framing Error Detection
• Noise Filtering Includes False Start Bit Detection and Digital Low Pass Filter
• Three Separate Interrupts on TX Complete, TX Data Register Empty, and RX Complete
• Multi-processor Communication Mode
• Double Speed Asynchronous Communication Mode
My USB to TTL serial adapter is apparently based on a ch340 chip. It looks almost exactly like the pic I attached, except mine does not have a crystal on it because I think the chip has an embedded clock. The important thing is the pins match my adapter.
My knee-jerk thought was to connect it as follows:
adapter → washing machine PCB
gnd → 0v
rxd → tx
txd → rx
3v3 → (nothing)
5v → 5v ← bad idea?
(with s1 jumped to 5v on the adapter)
Someone told me I should not connect 5v to 5v. I was assuming one connection needed 5v and the other supplied it, but I was told they are both supplying 5v, but not perfectly 5v, so the difference will strain something and cause damage.
So how should I hook this up?
update (I’m stuffed?)
I heard washing machine manufacturers often sabotage the serial ports before shipping as an anti-repair tactic. I thought my old machine might pre-date that practice, but I might be wrong. I metered TX voltage against 0v using a crappy cheap DMM. Results:
0.01, 0.00, 0.01, 0.00, 0.01, 0.00, 0.01, 0.00, … etc, every second or so.
Looked encouraging, as if there is activity. Then I metered 0v against 5v:
~~0.01, 0.00, 0.01, 0.00, 0.01, 0.00, 0.01, 0.00, … etc, every second or so.
Yikes. I was expecting that to read a steady 5v. Due to bad wiring in the house, I think that is just noise on the ground wire. And apparently the serial port is dead.
I had the two 5v lines connected to each other for a while, so it’s possible I damaged it, if not the manufacturer.~~
Update 2: I have 5v, so the port may work
It turns out I had a bad alligator clip, so of course I got a flat reading. The 5v pin on the serial port gives 5v. Thus I might have a live port. Now how do I use it?

5
Unfortunately I have excessive battery drain in the left earbud of my Sony WF XM4 set. I really like these earbuds and I am going to at least try to fix them. Has anyone here done any thing like this before?
It makes sense, honestly, that the left runs down faster than the right, I use just the left at work all day everyday and only use the right at home maybe once a week. The left lasts 2.5 hours, the right lasts six or more.

6
7
8
5
Beko deliberately conceals error codes and repair info from consumers -- is that common? Google is the repair video gatekeeper. PCB has TX/RX port -- what is that?
(media.thebrainbin.org)
I was never able to obtain the service manual (thread).
When I called them for repair info, they asked me if I was a consumer or a pro repair tech. I find the question disturbing. If I lie then I risk them making assumptions about my tools and perhaps willingness to pay for wiring diagrams and service manuals. They probably assume I would have access to some kind of subscription to a pro repair platform that has that info. So I admitted to being a consumer at the risk of being told “call a pro”. They asked what was wrong with the machine, then I got cut off because I ran out of phone credit (after being on hold for a long time). A glimpse of their answer before the call dropped sounded like incorrect speculation.
Google as a repair gatekeeper
I’ve watched a lot of Youtube videos. Also quite disturbed that Google is the gatekeeper of educational repair videos which it blocks me from saving a local copy of. I can only watch at the public library because I do not have an unlimited connection. So I have to memorize steps or take notes.
I don’t give a shit if Google jails viral cat videos. But Google jails knowledge, and it’s knowledge that ecocide avoidance depends on. Maybe we need some #Greenpeace sponsored peertube instances to become a go-to for repair instructions.
Error codes concealed
One of the youtubers said Beko’s PCB stores the error internally but it will not allow consumers to see the error code. Does anyone see a legit reason for this? Even if they intend to block consumer repair, consumers would still have a legit use for the code -- to have an idea of the cost of a problem before calling out a costly technician. It would also be sensible to to give the code to the technician in advance.
The Youtuber (fuck I hate that term) gave a secret sequence of steps to get the PCB to disclose the error code. The special sequence has no effect on my particular model. Different models have different secret sequences to reach the diagnostic mode, and no youtuber has covered my exact model. Similar models from roughly the same time period are covered in various non-English languages, but when I repeat the motions I do not reach diagnostic mode.
Do I have a serial port?
The PCB has unused pins labeled 5v, TX, RX, ~~9v~~ 0v. Apparently this is a serial port for an RS232 cable. What info likely comes from it? My boiler PCB has the same thing and in that case there are mere hints in the docs that it is to attach a device that transmits telemetry data over GSM. Would a washing machine have that? Or is it to attach a PC or proprietary device to get detailed telemetry data?
Secret steps to tell the machine that the fault is gone
A youtuber gave the impression that after fixing the problem (whatever it is, I still don’t know), the PCB will still think there is a fault until steps are taken to clear the error. The video ended before he explained how to do that -- although it was not my model and would not have worked for me anyway. But I have to wonder if my problem is merely a false detection of a problem. Or if it’s a real problem that I fix, is it likely that I have track down a special sequence of steps to tell the PCB the fault is fixed?
I think if I could go back in time and mention this experience to Twilight Zone writers in the 1980s, they would simply write this into an episode as-is.
9
10
7
trying to test washing machine motor; saw a white flash, voltage dropped, what happened?
(piped.manganiello.tech)
11
26
Why not fix it yourself! It behooves us to repair our own busted machines wherever possible
(www.theguardian.com)
12
13
I cannot repair my washing machine without documentation. I have no idea how to use my multimeter to check the components. There are parts dealers for Beko in my area, but none of them have the service manual.
The parts shops all say go to the website for the manual as a flippant off-the-cuff answer. There are no service manuals on the Beko website -- at least not for my model. The navigation of the Beko website does not even have a path to docs. And worse, my model is treated as non-existent by the website.
What would I do if I were a professional repair service? What is the official channel?
I am open to “piracy¹” but it would be a long shot to scour all the dark web for a manual for a specific washing machine. It’s not the type of content people have a strong interest in spreading/trading.
¹As RMS says, it’s not a just and appropriate term for it (but “sharing” is awkward too).
(update) Added frame from Youtube video t1XaUolbjLY which shows that service manuals exist for at least some Beko models. As we can see in the snapshot, Beko wants to restrict who is servicing their machines. (btw the video covers a very different model than mine).
I probably need to find the test mode for my machine, comparable to YT video cq_uSyghZC0.
new problem
The machine reached a new low. Now there actually is a problem with the water valve, it seems. When running a program, it pauses then the start button just blinks. (It previously started by pumping then at least filled the tub). So I followed this video from the 5m10s position. I do not get 220v on either valve. But certainly I can see that 220V is getting to the control panel. So 220v goes into the control panel, but does not make it out of the control panel leads where the water valve connects.
(edit) The water valves themselves are fine (I connected 220v directly to the water valves and water flows). I guess I should suspect the pump now. The pump was actually the very first task back when the machine worked. So I should not have even been looking at the water valves which only start after the initial pumping ends.

14
15
16
17
18
19
Decided to restore this old thing from out in the shed. It was in the weather for a couple of years, and I think it's 20+ years old.
Replaced the pump with a USB powered 5 watt silent one.
Replaced the halogen lamp with an LED one.
Cleaned as much as I could.
Seems to be working well. How long the $12 ebay pump lasts remains to be seen.
More pics at https://photos.app.goo.gl/HDmVb2K1MeUQTfuG8

20
21
22
23
24
25
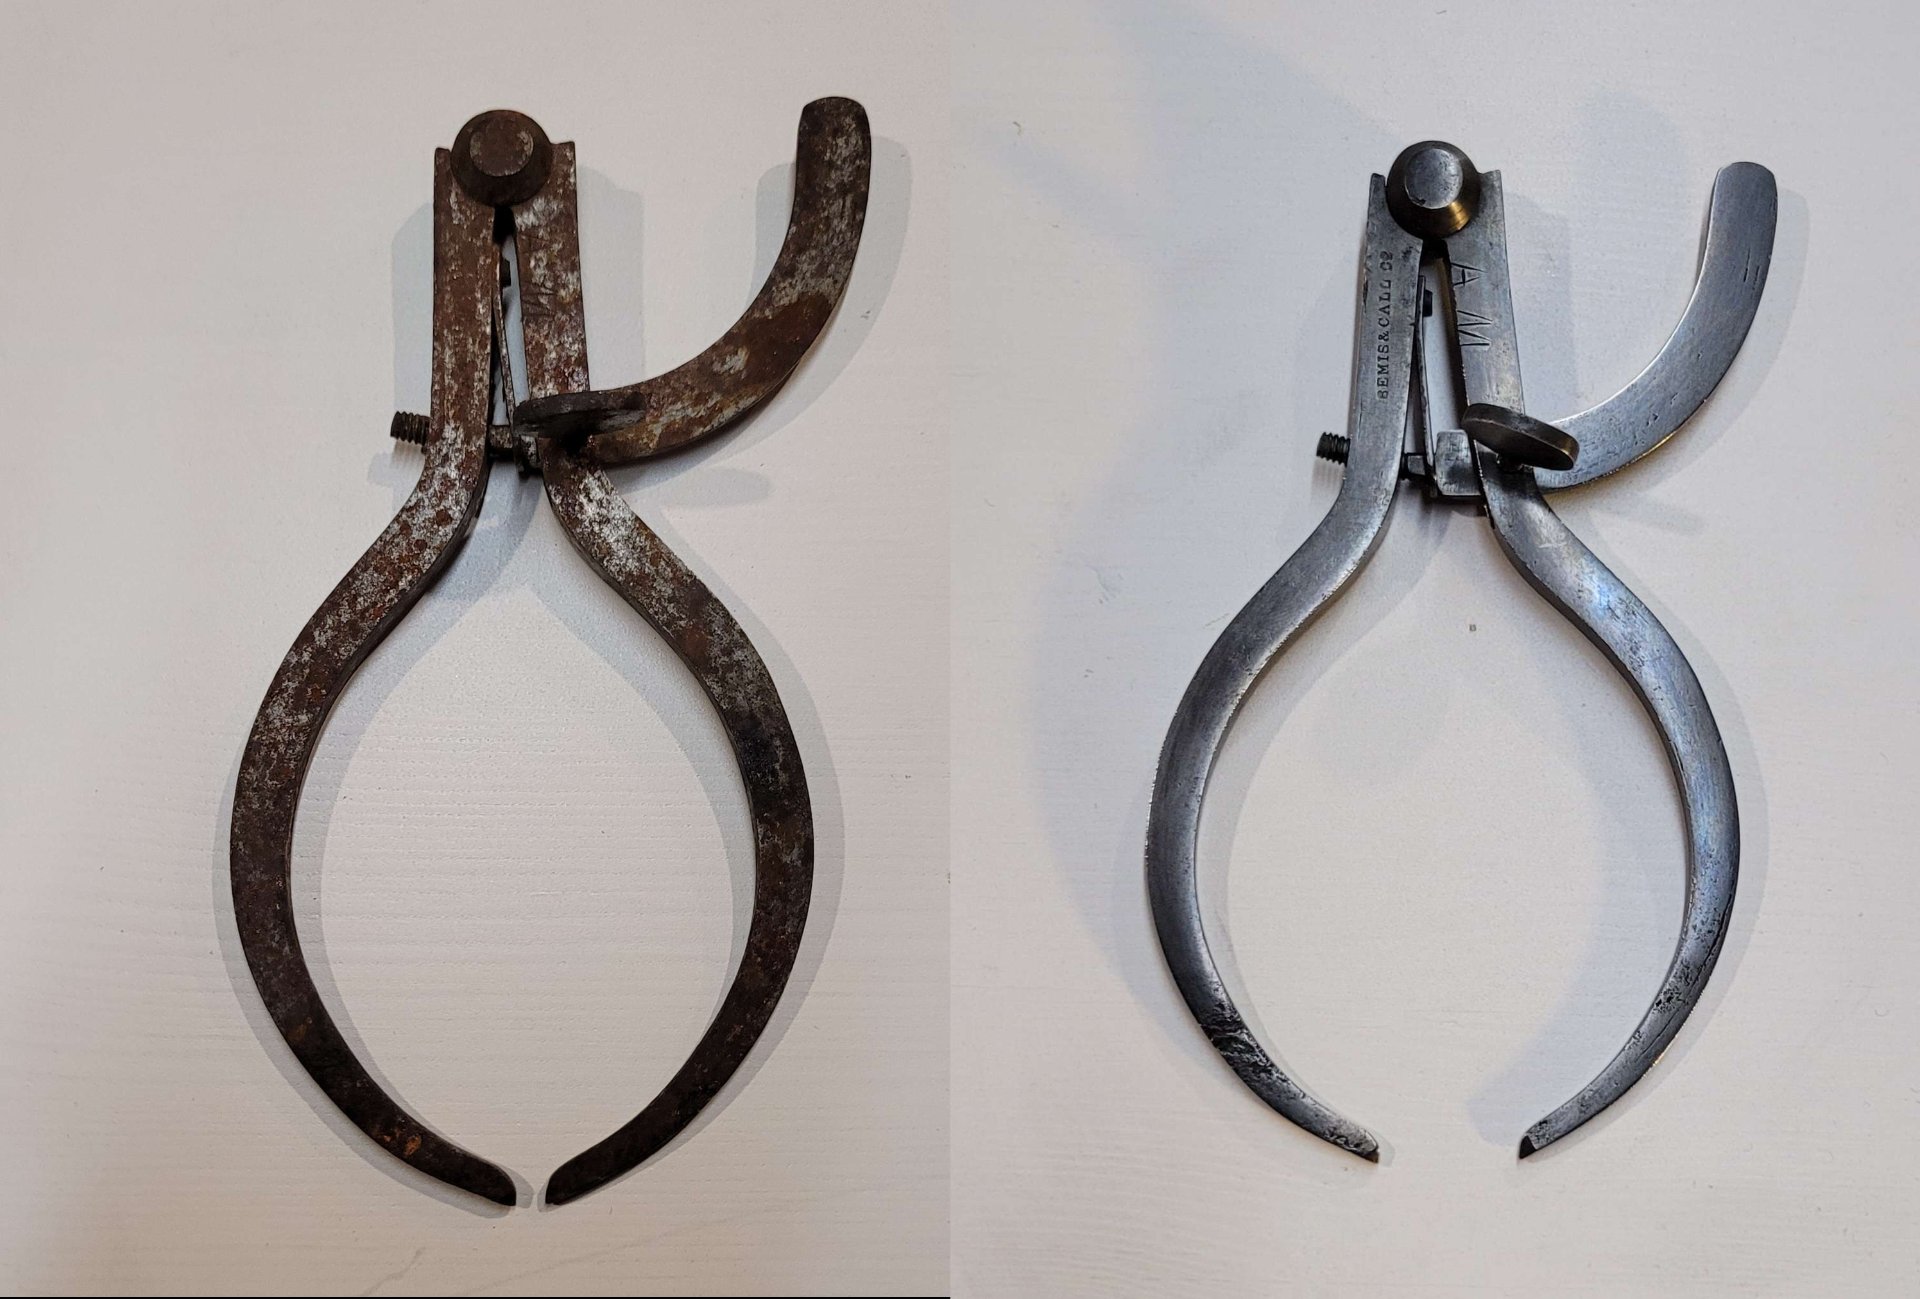
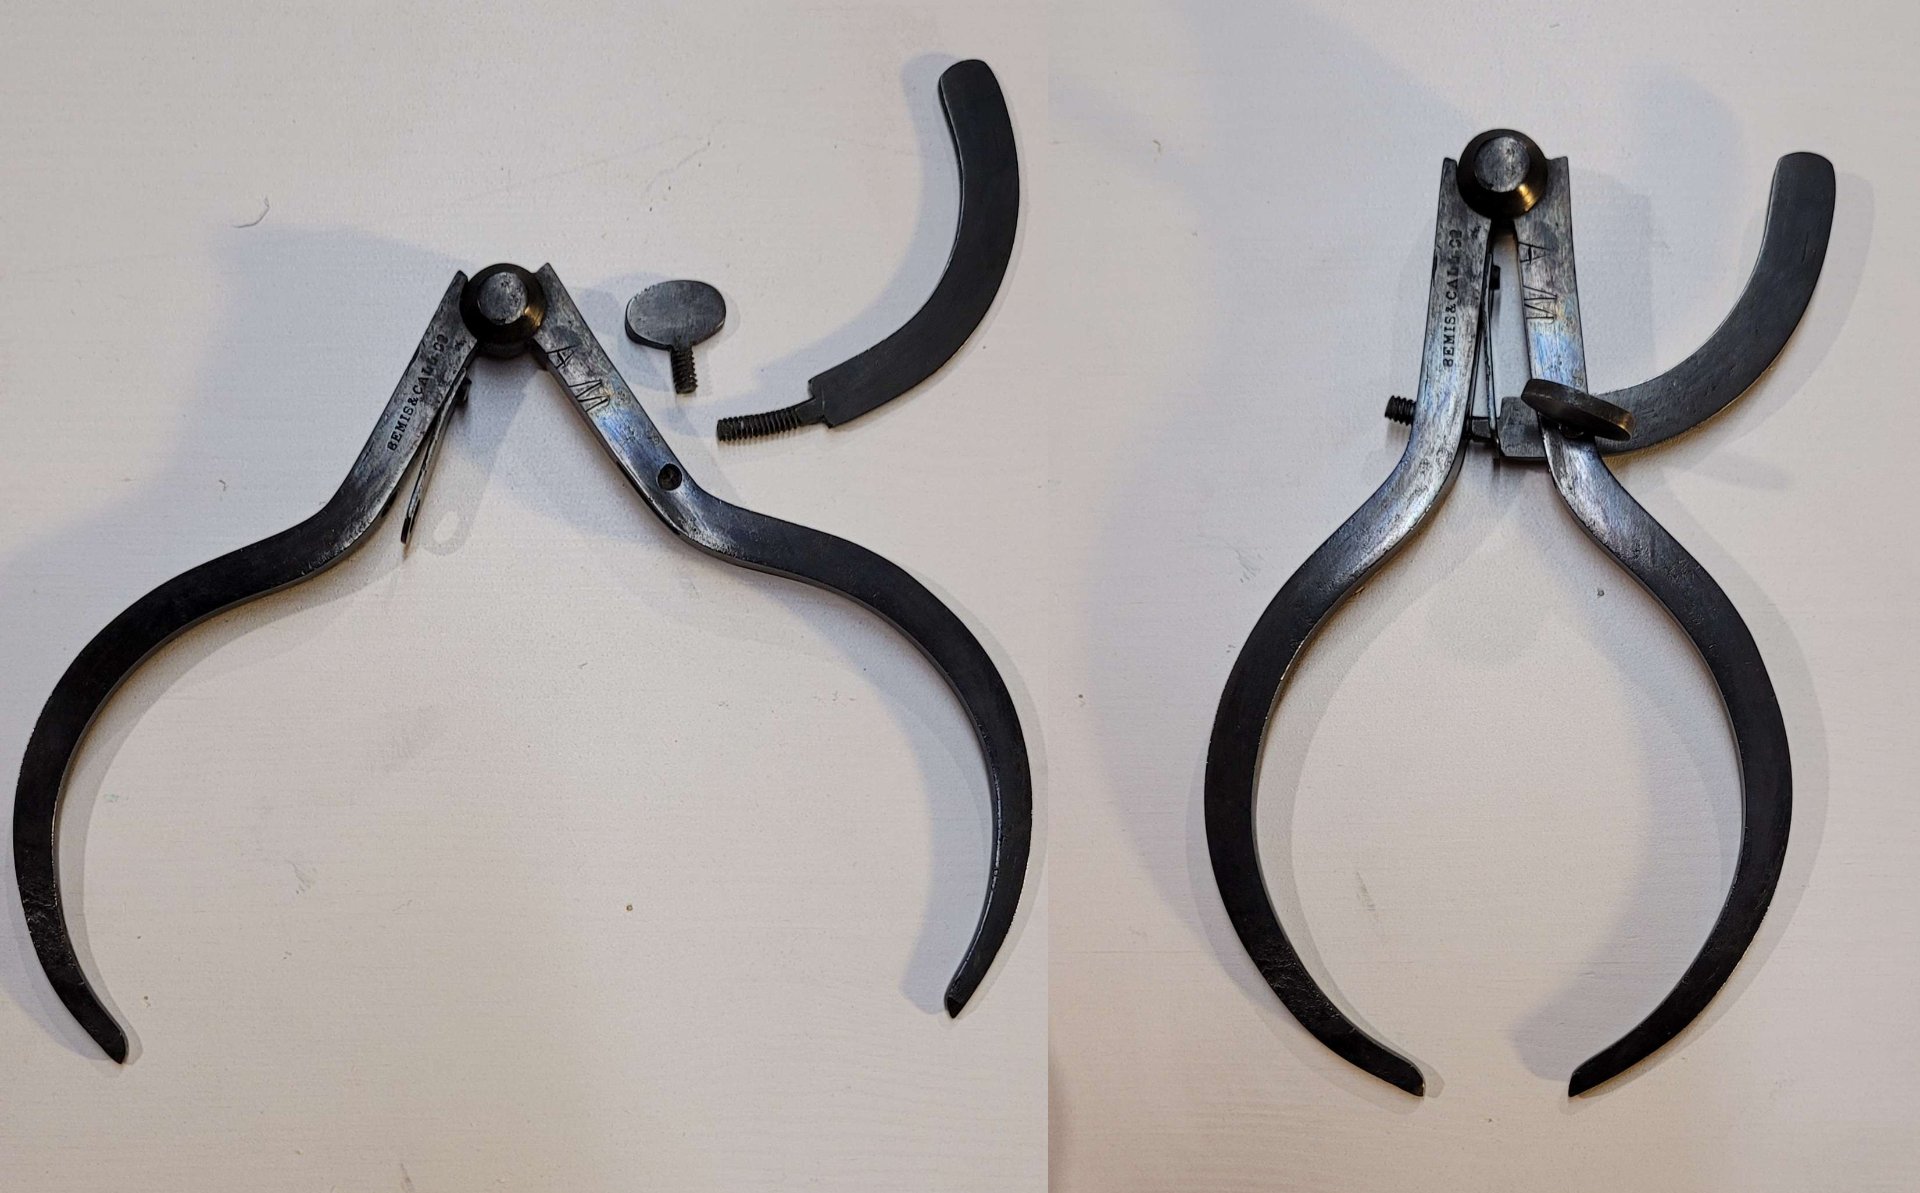
I bought this set of outside calipers at a junk store in my hometown (sort of a consignment, thrift store deal, with lots of old furniture, and the contents of like half a dozen garages right down to the old jars of mismatched screws. I sort of use it like a hardware store).
I like this design a lot, I like the lack of a spring on the jaws, and that you can fasten the little distance measuring arm to the side it measures on, so you can close the calipers around something, tighten that wing screw, then open the calipers to get them back.
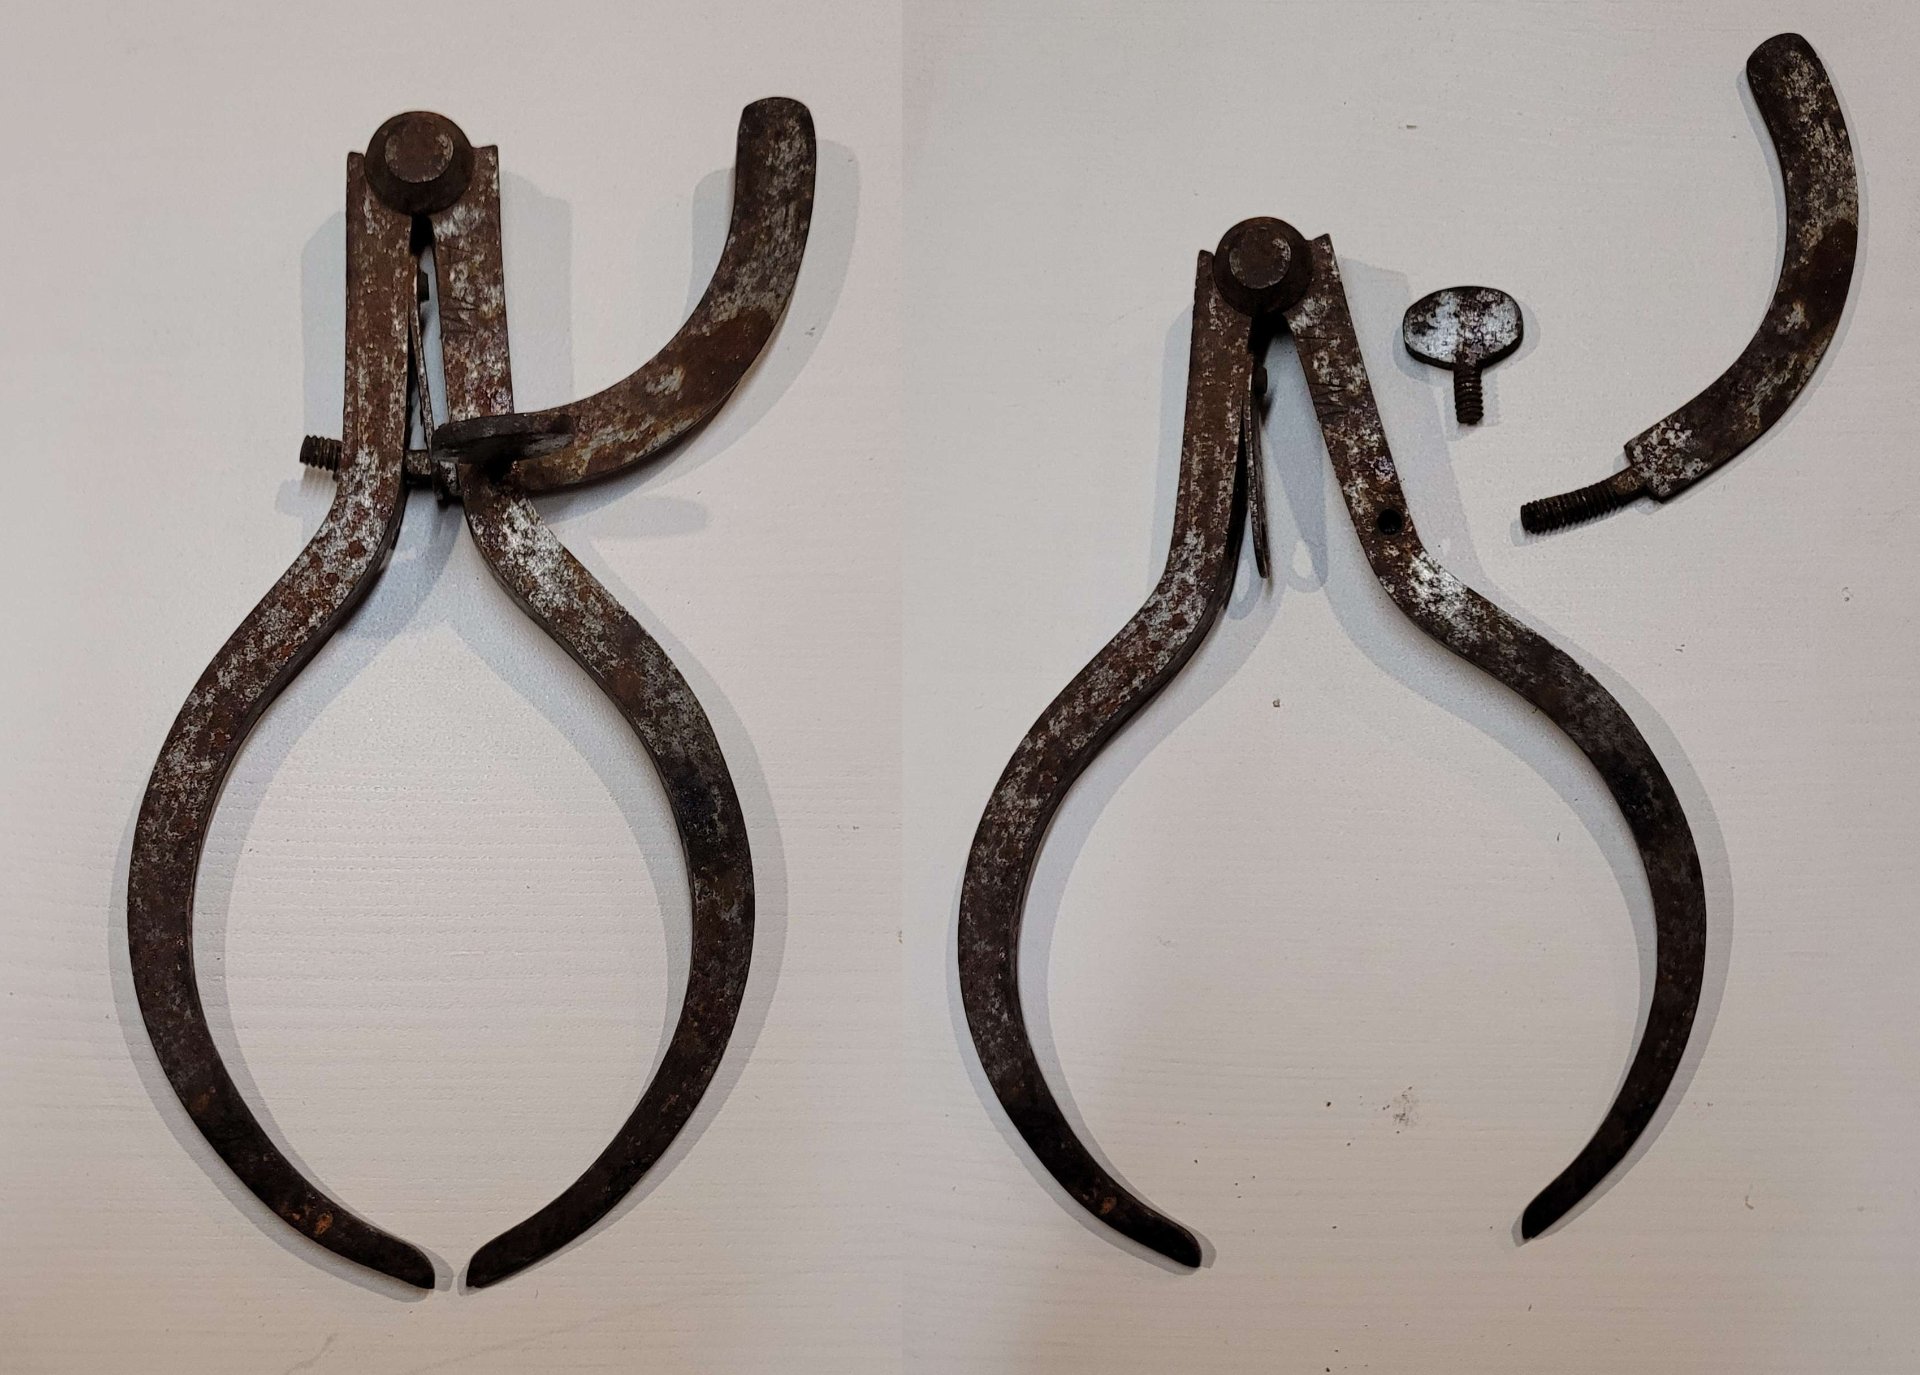
They had some surface rust, so I decided to clean them up. The first step was to disassemble them. Not difficult when there's only three pieces involved.
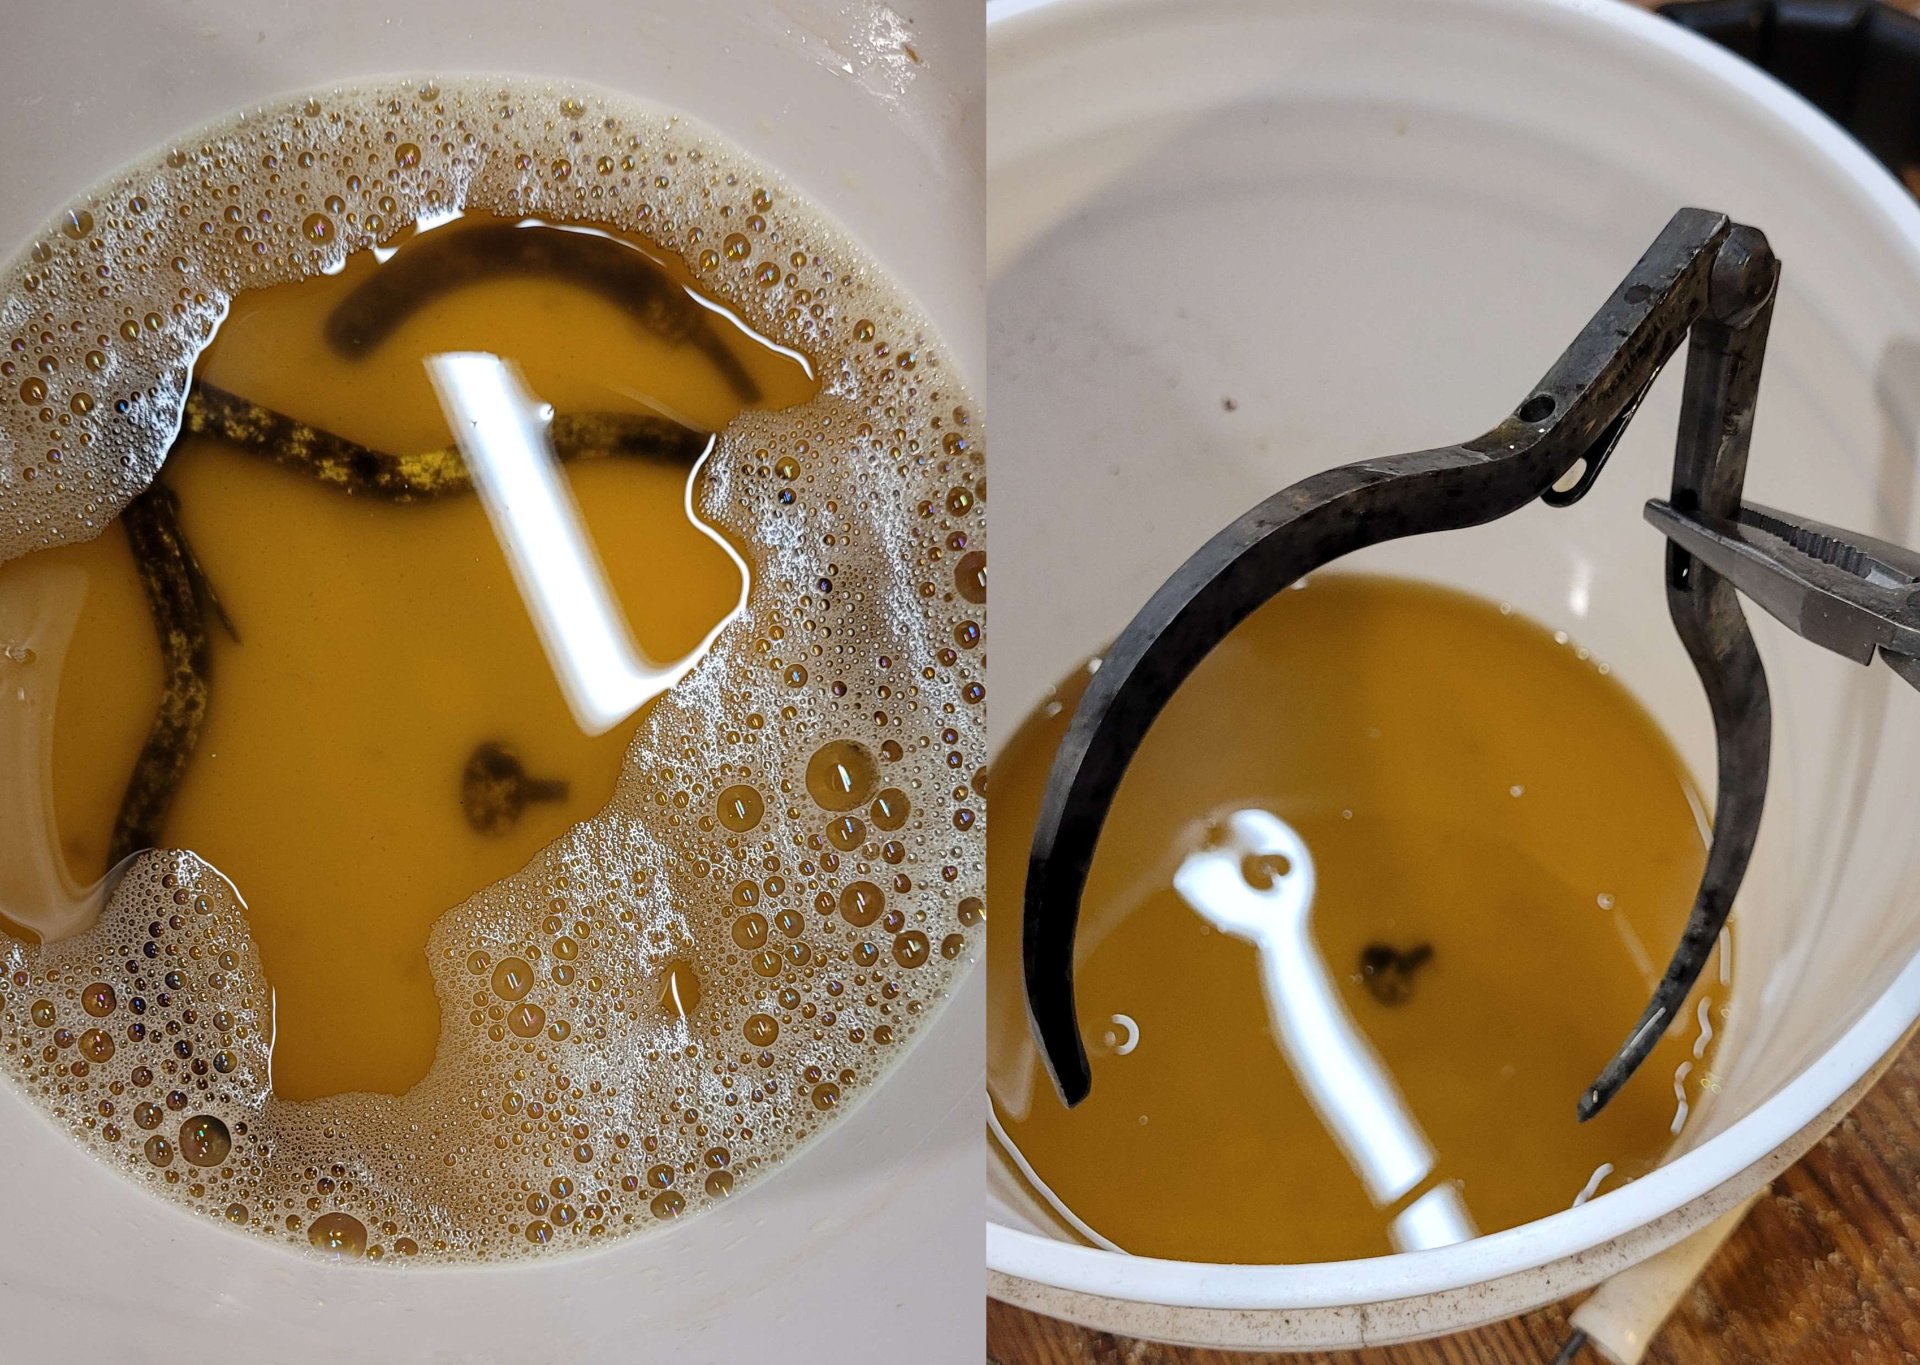
I let them soak in some evaporust for about 8 hours. I really like this stuff, it hits the sweet spot between very effective and not especially dangerous, and it's reusable! They do overestimate how effective it is in their instructions though, so it often takes longer.
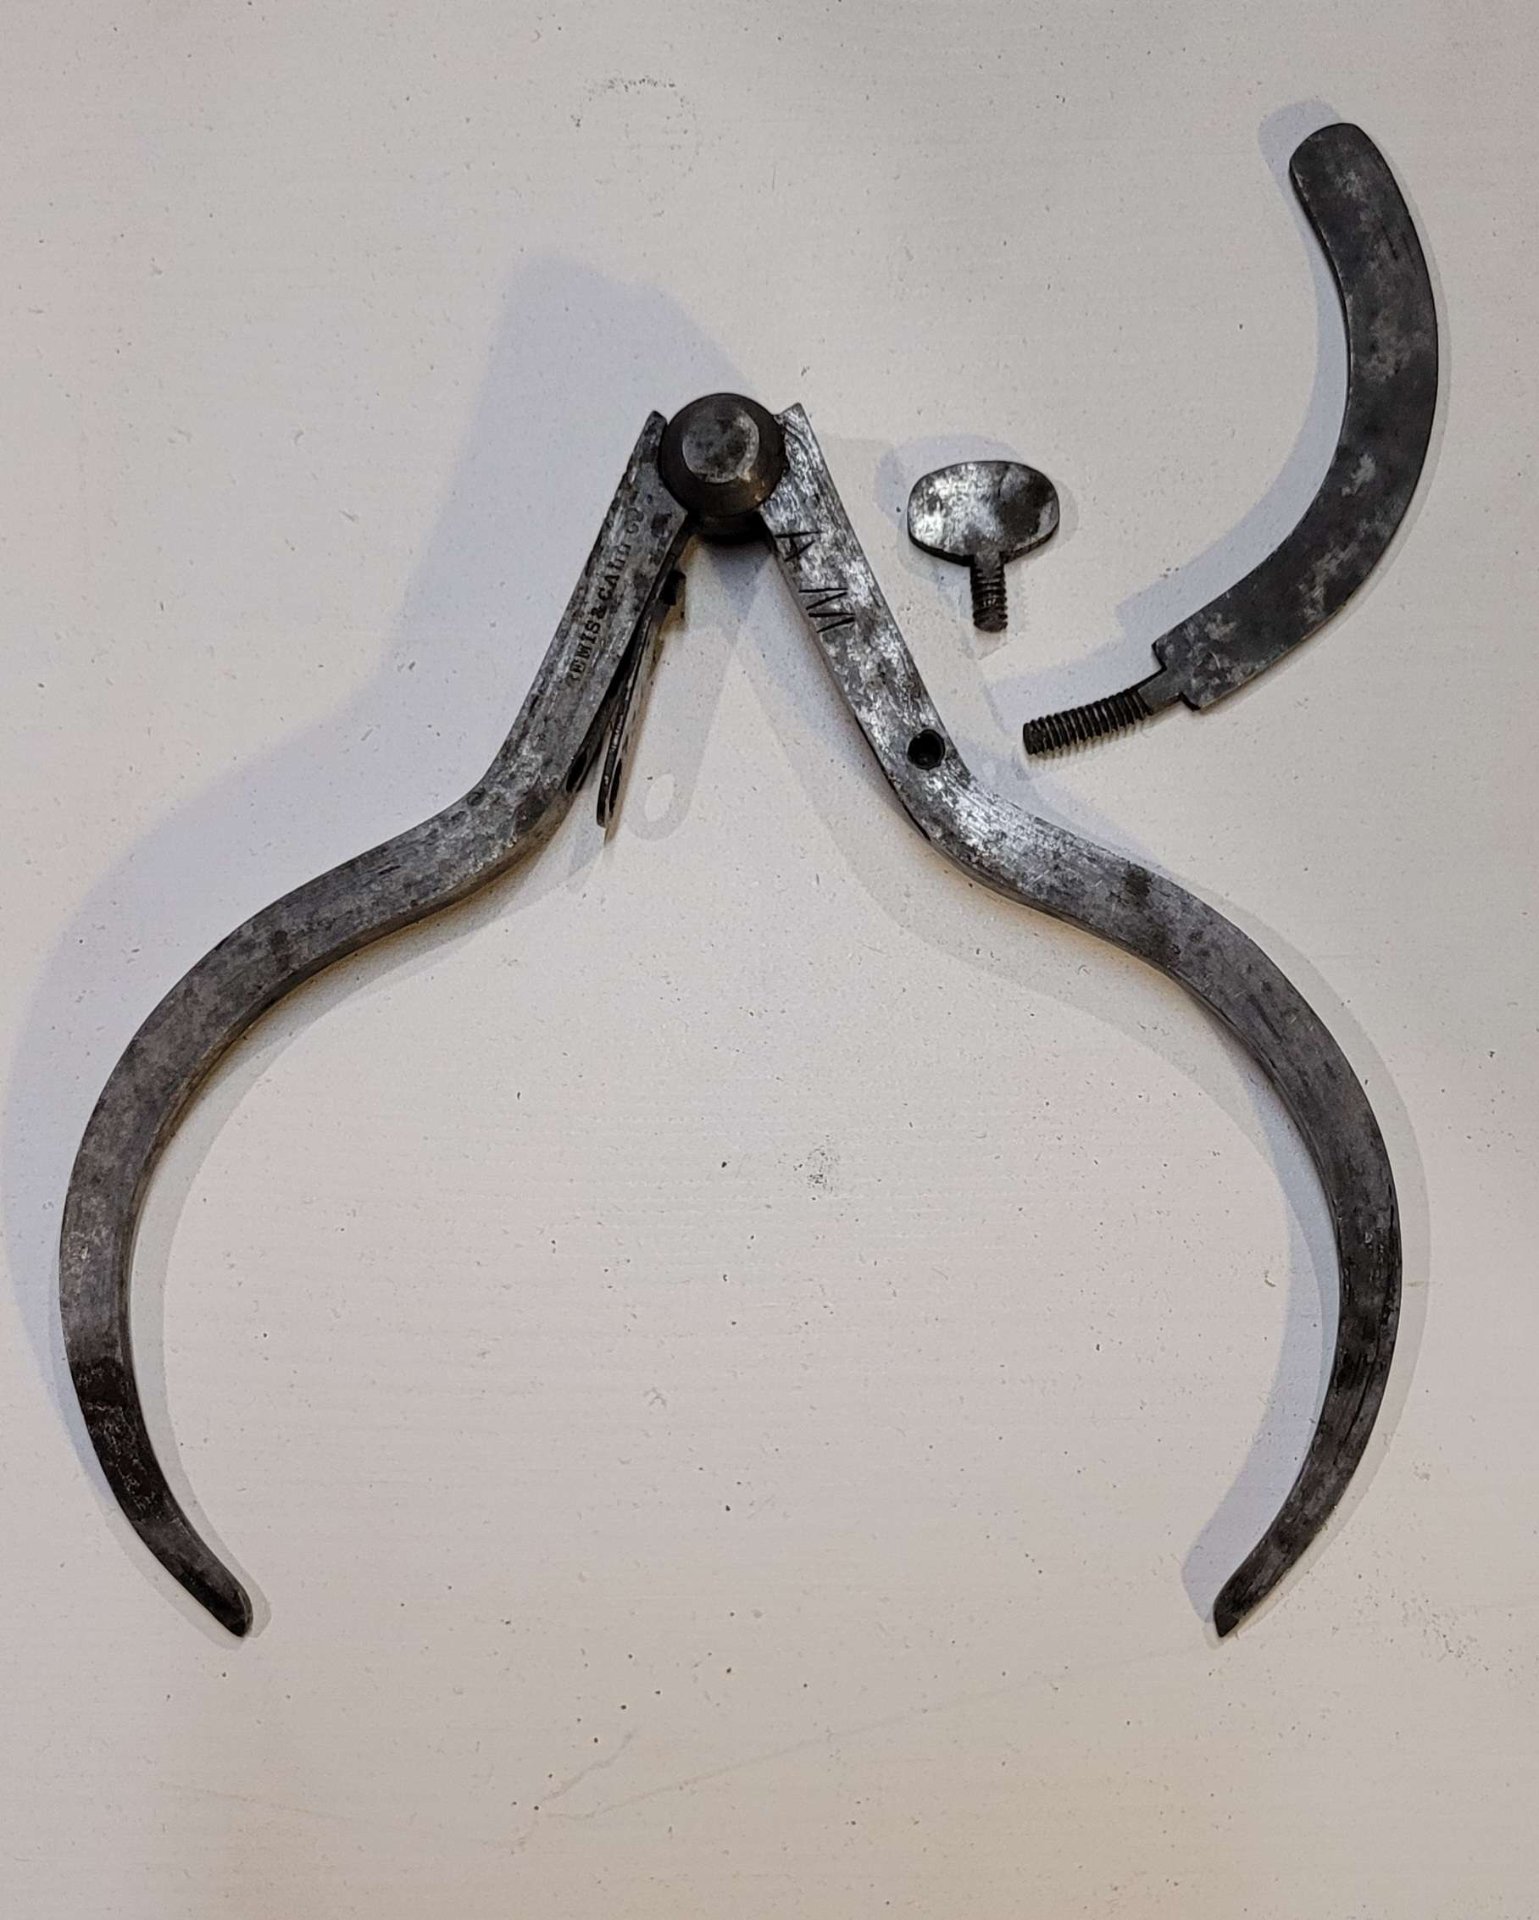 The calipers, straight out of the evaporust. You can already see some text which was hidden before, along with the initials AM from a previous owner.
Now that the worst of the rust had been dissolved, it was time to switch from chemical to mechanical cleaning. I sanded it down with 400 grit emery cloth.
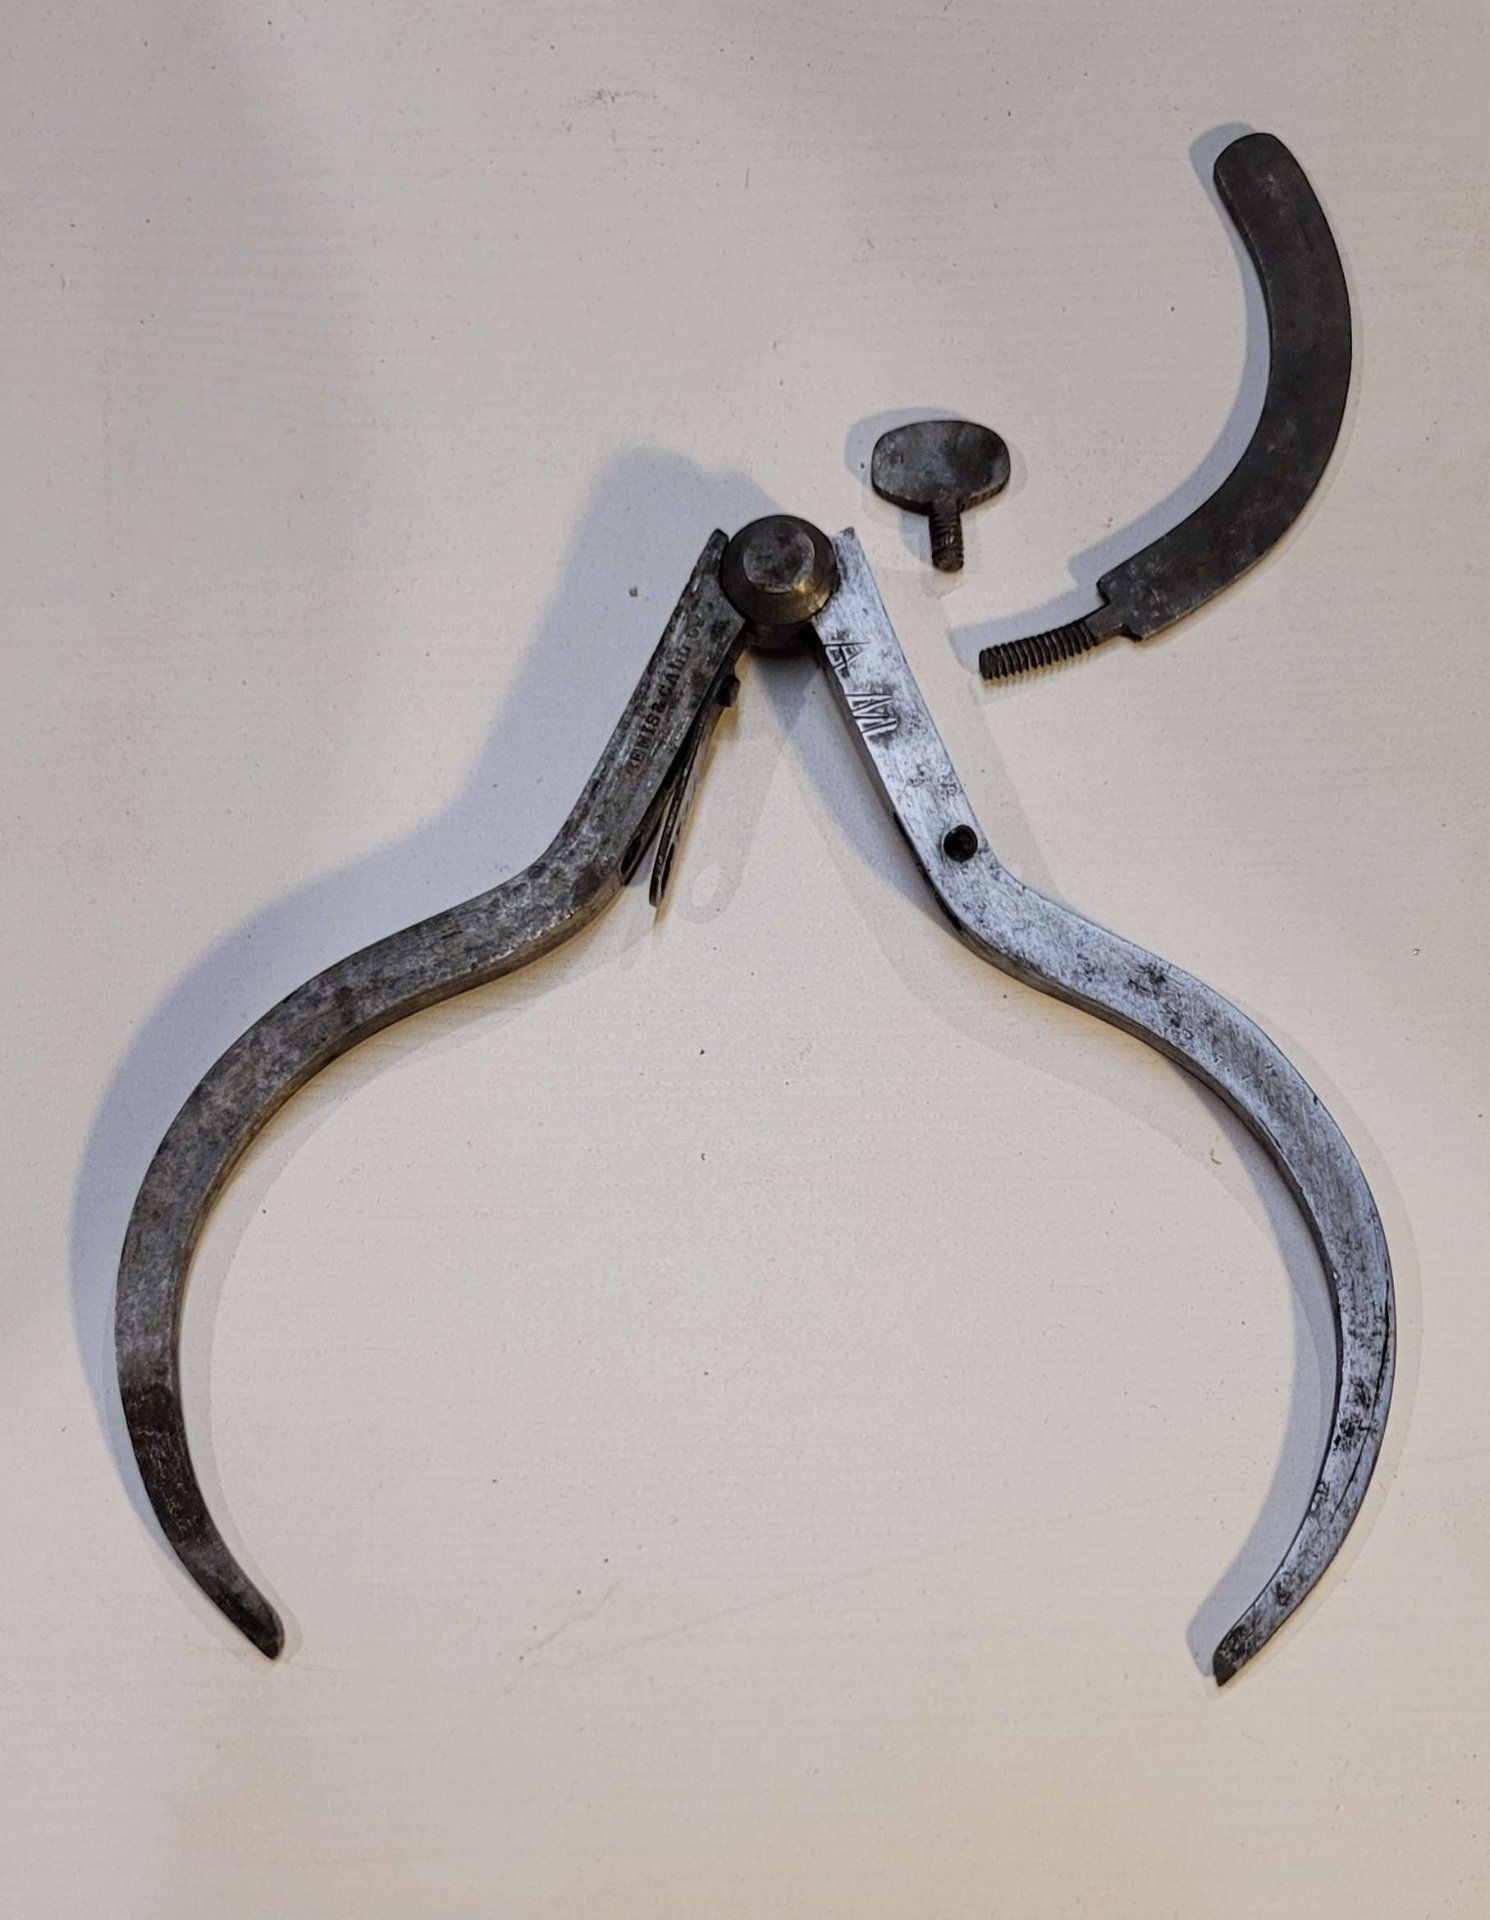 The calipers with only one side sanded.
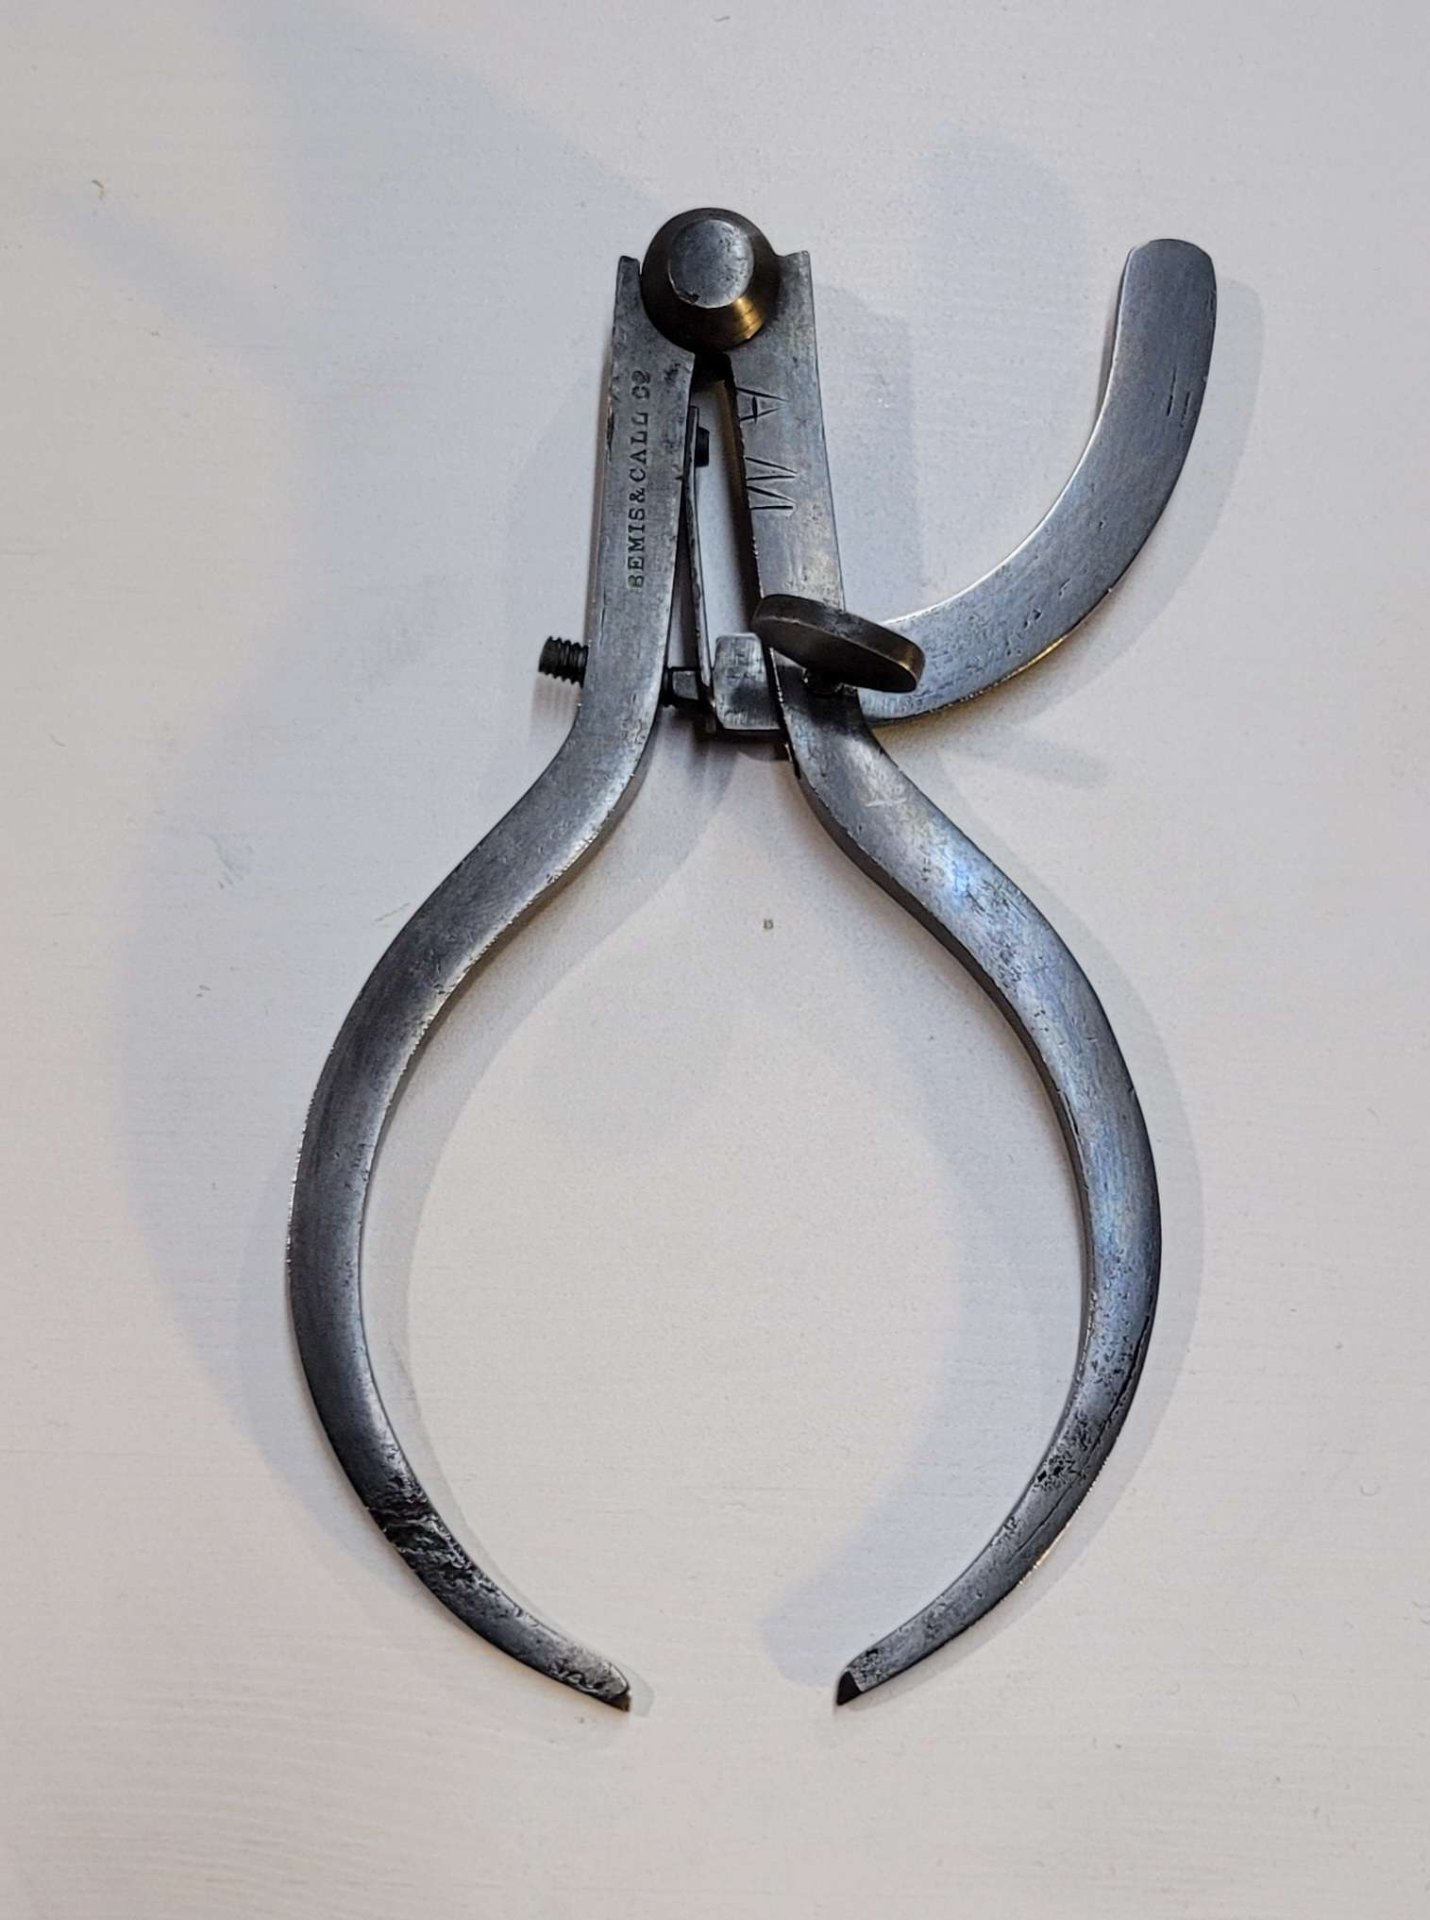
As I cleaned up the sides, I found a few neat bits of history:
 Here's some funny nicks up near the joint on one side. I wonder what caused them. And the previous owner's mark on the right side, AM. This is a big part of why I love old tools. I love the history they carry with them, even if I don't know all of it.
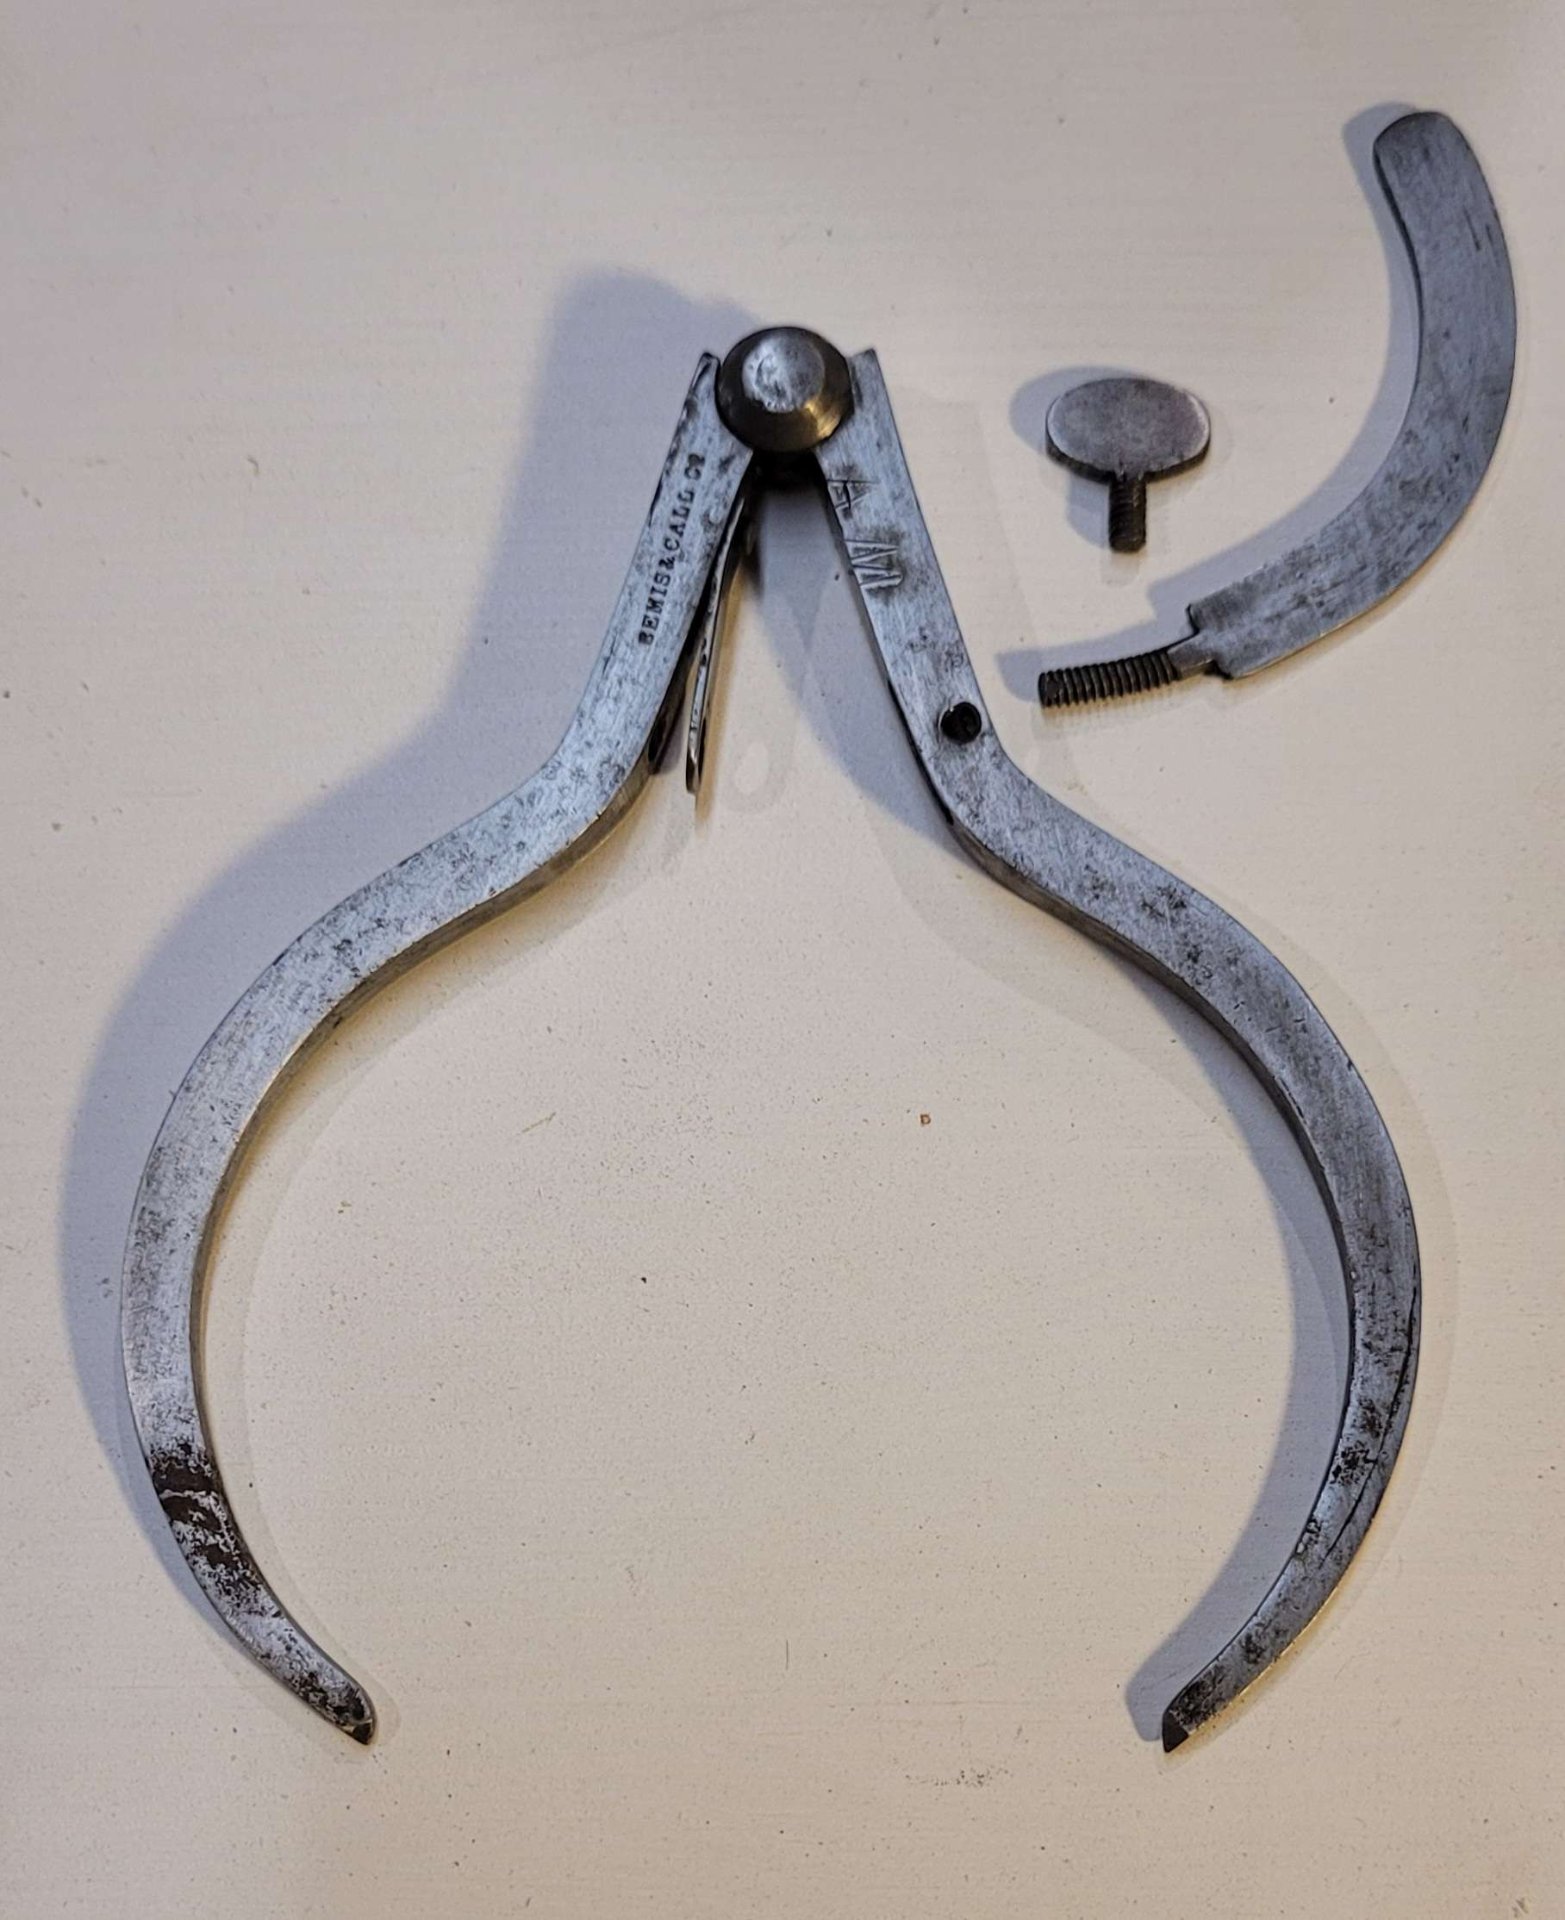 Looking better, but still a ways to go. I was surprised to find that there weren't any markings on the little distance arm. I'd been expecting to find little angle tickmarks or something, maybe even printed numbers, but there weren't any to be seen after the evaporust, or once I started gently sanding off the remaining rust and the black crud evaporust leaves behind.
Once I had most of the rust gone, I switched to steel wool. I didn't want to take too much material off the surfaces, and I felt the more flexible steel wool would hit inside the pitting from the rust better.
The steel wool shined it up quite nicely. And here's a closeup of some of the surface pitting left over by the rust on the left side. The back of these calipers didn't have this kind of damage.
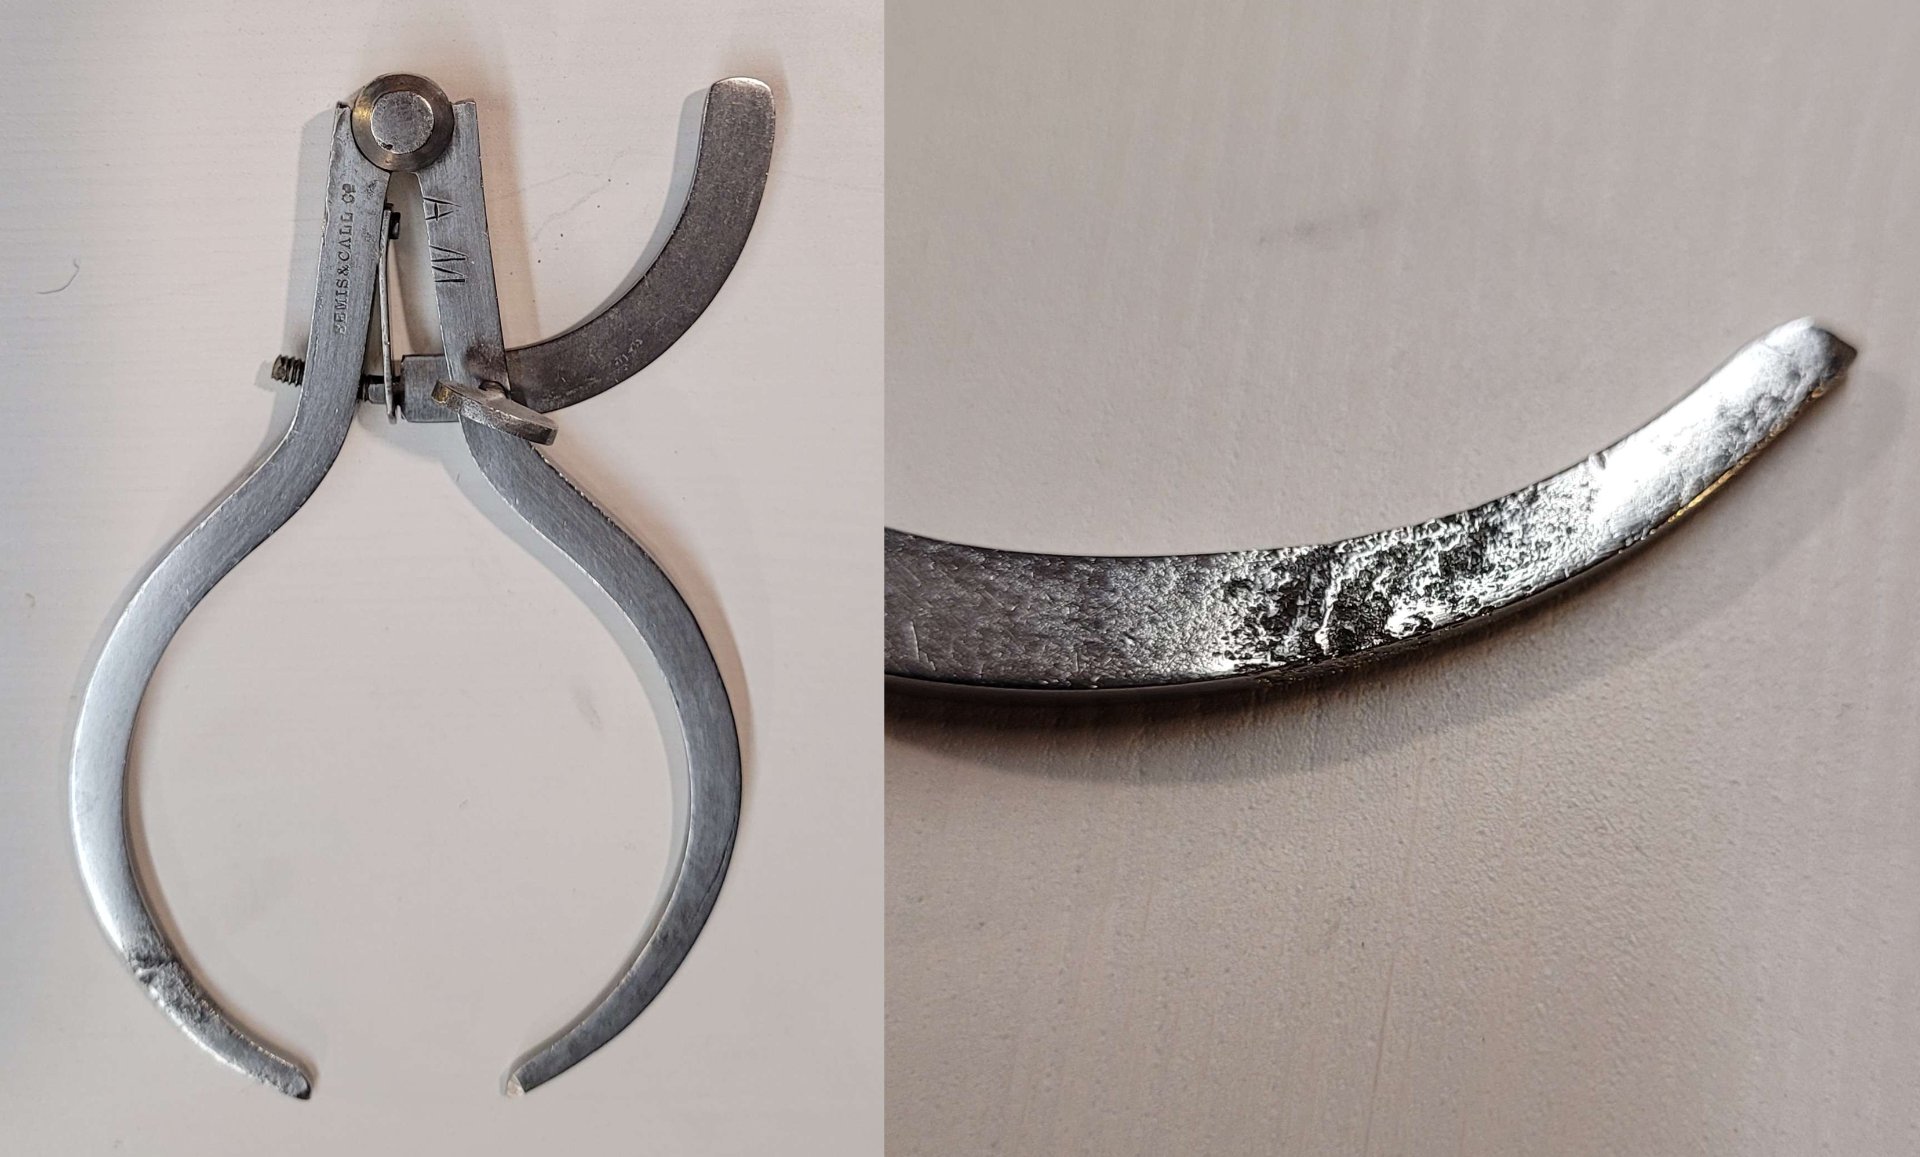
It was tempting to leave it here, but I didn't want the rust to return, so I decided to treat the calipers with cold blue, to provide some protection against oxidation. There are other ways to protect steel, but I like the look and it seems to hold up well enough.
Cold blue always looks a little rough when it first goes on (this stuff is a gel you don't want to get on your hands. You wipe it on, leave it to darken the metal for 60 seconds, and wipe it off again) but a little burnishing with 0000 steel wool will tidy it up:
There we go, still pretty shiny, but not as likely to rust again. Not bad considering how it looked in the beginning. Hope you'd approve, AM.
(I wrote this post for the making/fixing things blog I have on our local movim instance. If you're a slrpnk.net local, your credentials will work on movim automatically!)

view more: next ›