101
diy
22224 readers
2 users here now
Finally, a comm for that one user who hand-makes longbows. This ones for you, comrade.
founded 4 years ago
MODERATORS
102
103
104
105
I've been on a hot streak with my bot designs so I thought I'd make another post about about what I've been working on in the world of combat robots.
When I last left off, I hit a snag with GIANT ENEMY CRAB 2 and started a side project.. I started designing a new simple 1lb Antweight bot with a powerful four-wheel drive, with plans to give it an armored wedge and turn it into a defensive control bot. Where we left off it was basically a big box with the appropriate electronic and mechanical components, with plans for future mountings.
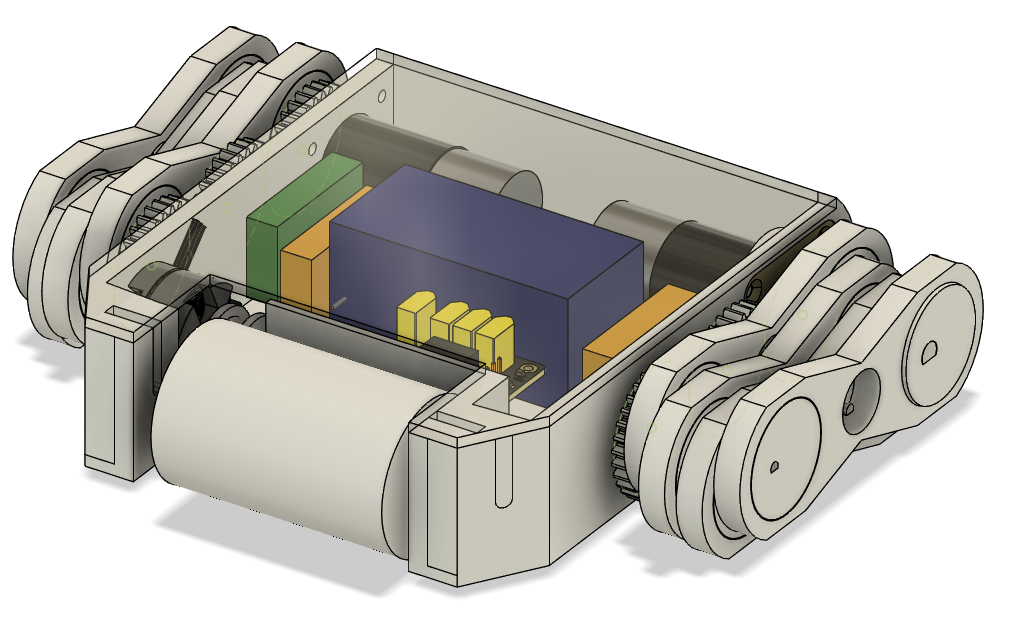
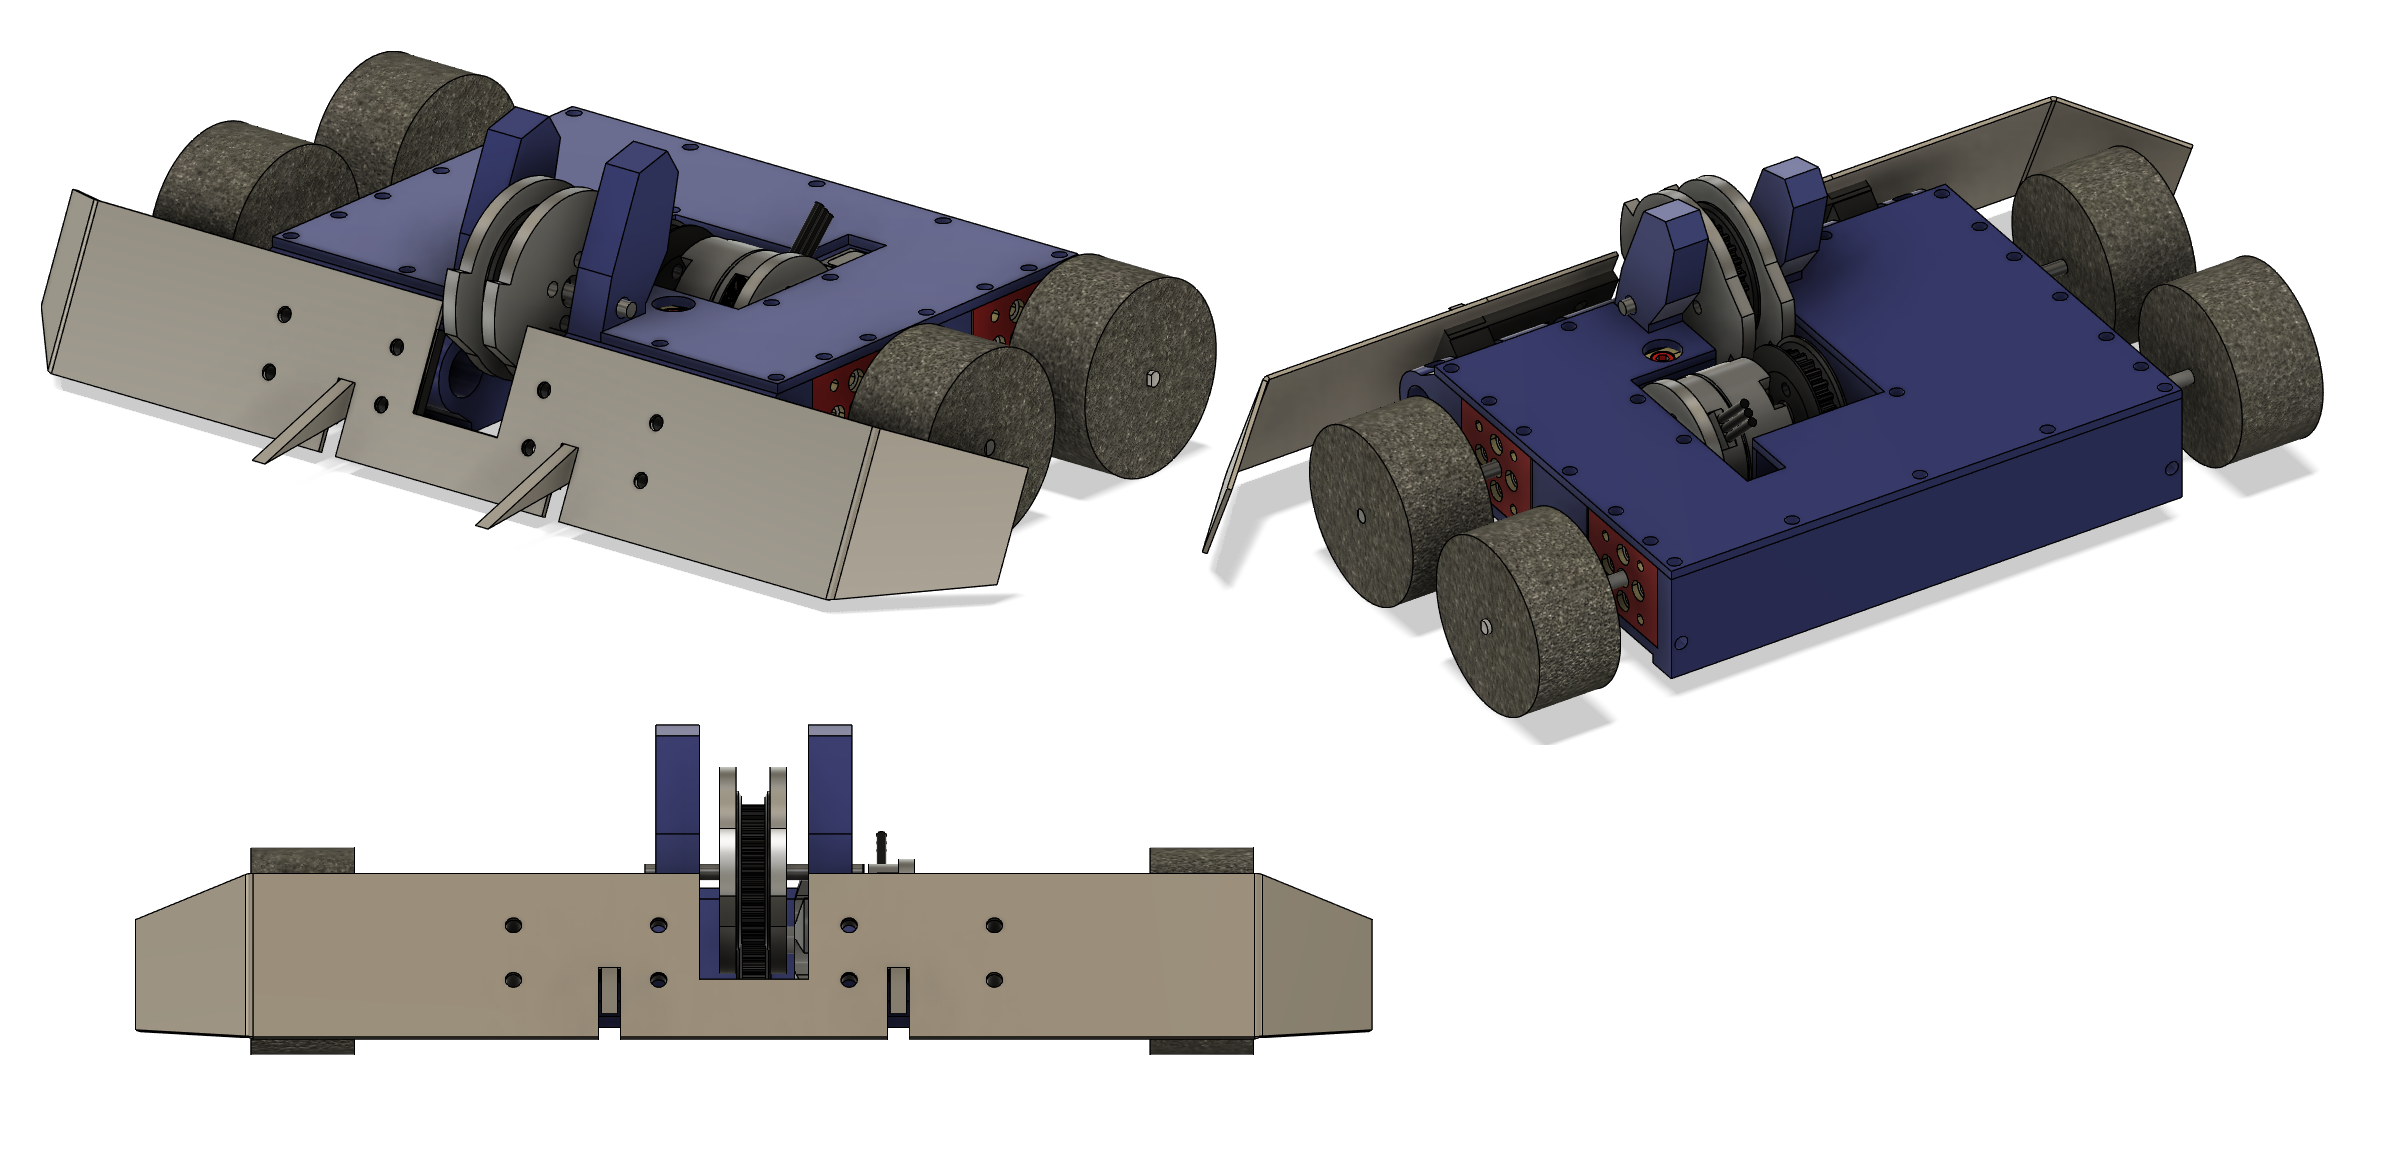
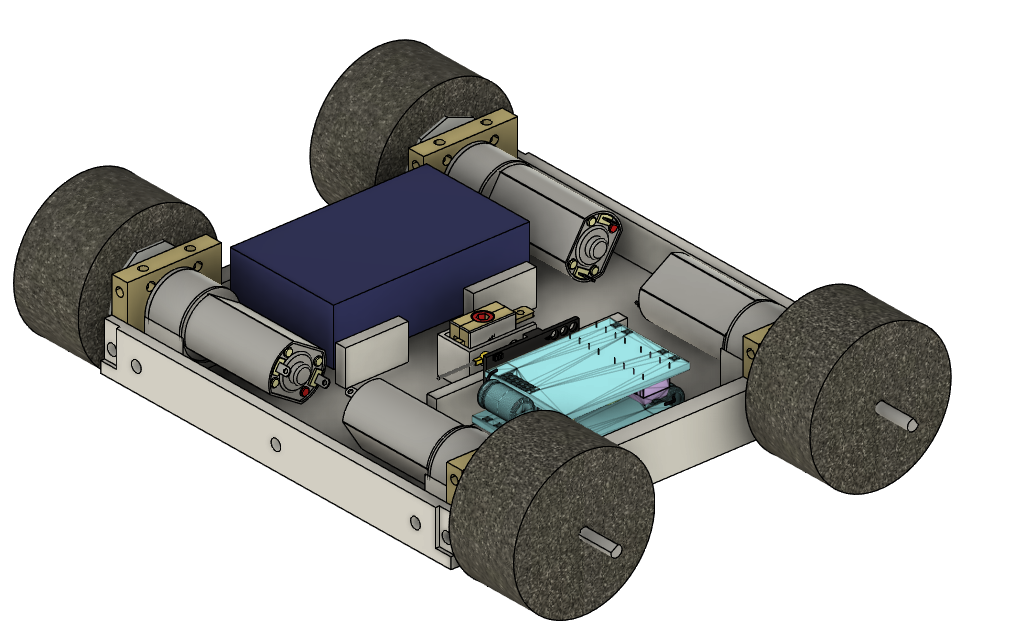
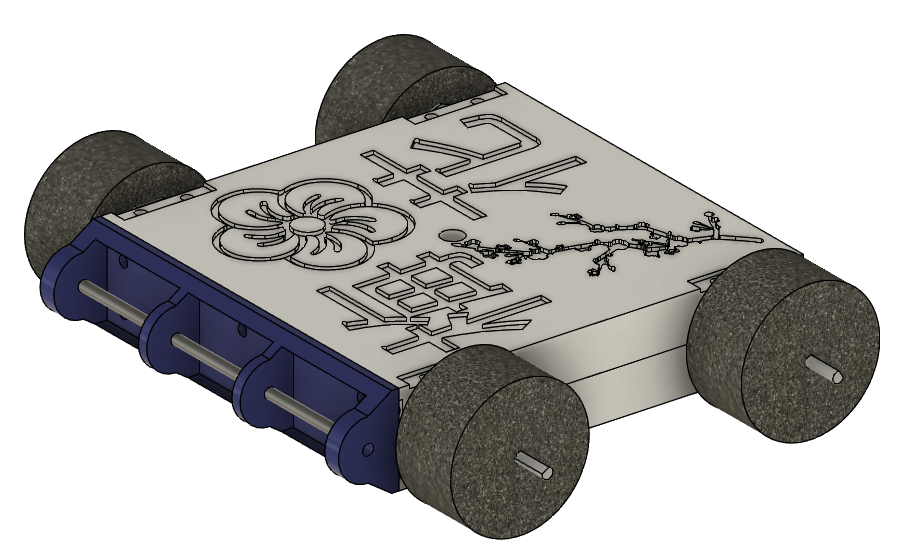
So the first big change I made was to how the lid would mount. My initial idea was to have the lid screw on to the 8 top holes in the bearing blocks that the motors are mounted onto. But then I thought, part of my design is that I wanted to be invertible. So why not split the whole bot in half like a clamshell, with each half screwing into 12 points (8 on the top/bottom, 2 on front and 2 on back)? I got to it. This left me with two major goals remaining for the bot: I needed to create an invertible defensive wedge on the front, and I needed to make the bot pretty and thematic as hell.
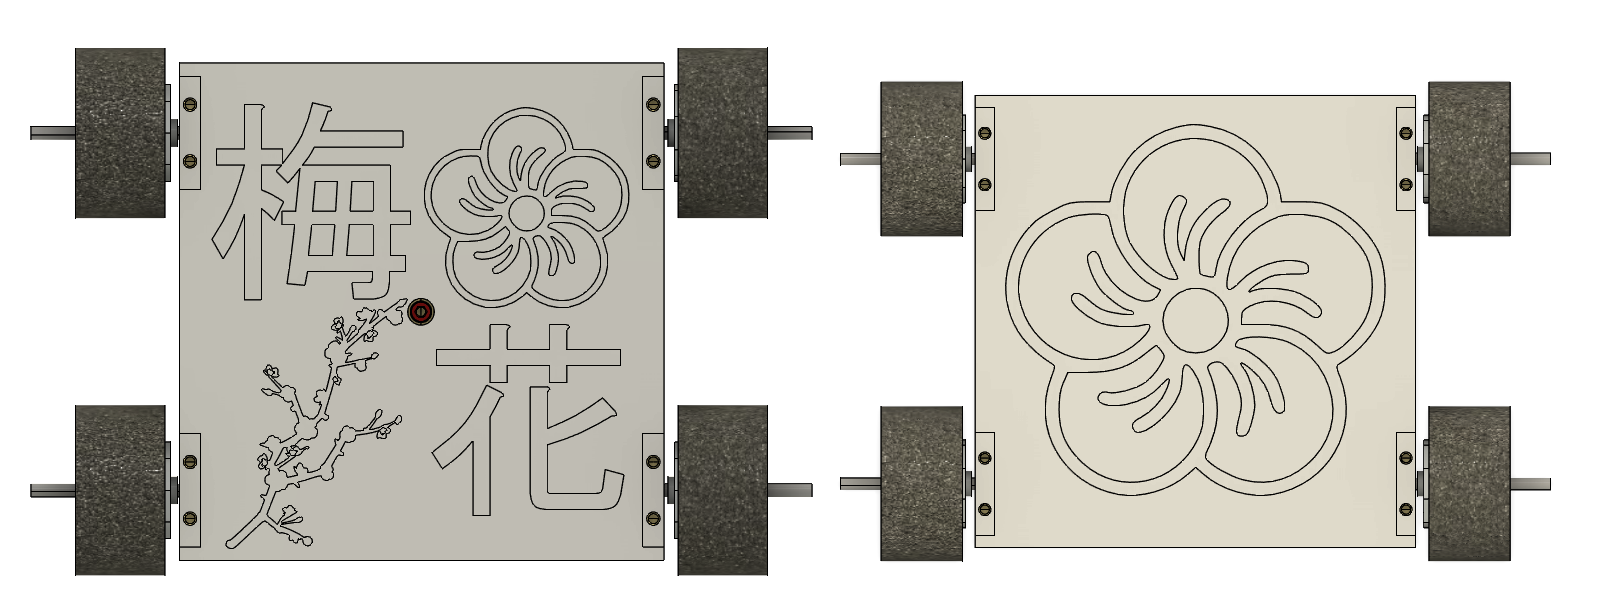
Ever since I saw the Botkits D2, I kinda wanted a pink one. I would name it 梅花 (Plum Blossom), and cover it with stickers of flowers and stuff. This bot is also going to be a four-wheel drive wedge of sorts, so I repurposed that name and theme. But unlike billet aluminum, 3d models are very easy to engrave, so I got to adding some SVG files in Fusion and engraving the top and bottom of the bot to the depth of 1mm (still 2mm at the narrowest point of the chassis). Here is the new top and bottom.
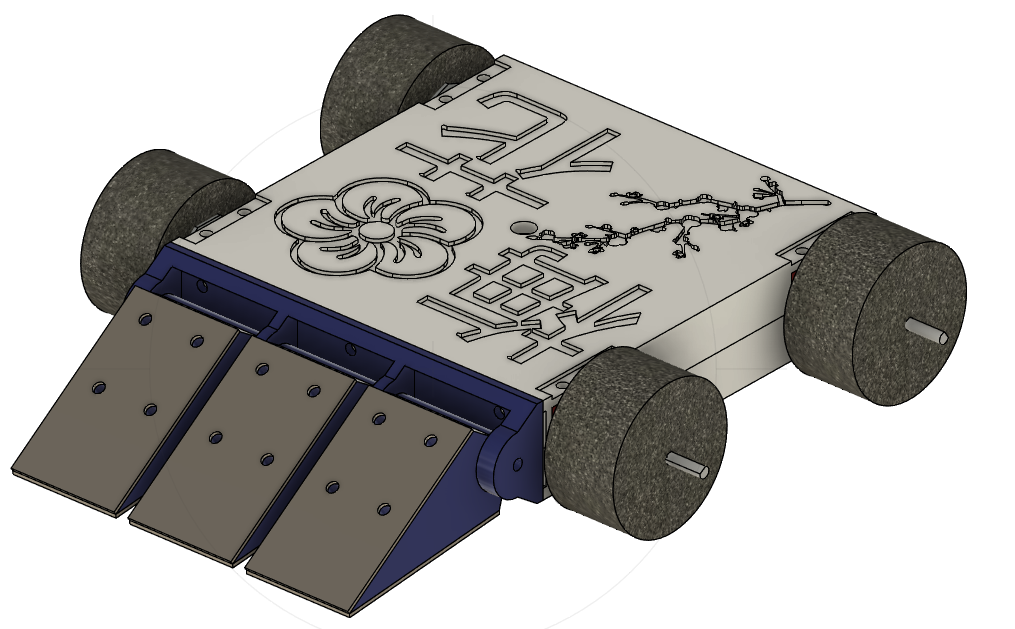
From there, I got to work on the wedge system. My most recent bot Jackalope used a hinged wedge system hanging on a loose pivot, using gravity to keep it low to the ground while having a good amount of give. I thought that would be a good idea for Plum Blossom's wedge. I created a mounting bracket and mounted a series of wedgelets on the front similar to the heavyweight bot Free Shipping without the forklift or flamethrower. These wedgelets would be made of an impact-resistant material. and lined with titanium shingles on the top and bottom. They will pivot on the mounting bracket with gravity. Idea being, whether Plum Blossom is driving right side up or upside down, the wedgelets should be touching the floor and the bot will have a titanium wedge up front. Here is what I came up with.
Next I hit a crisis. My bot was basically ready. All I had to do was assemble, check the weight, and iterate. I could at least confidently buy the parts for it. So I go to my """local""" Fingertech supplier and...
They're sold out of Silver Spark motors. The core of the bot (the drive) is completely out of stock. The whole bot needs to go on hiatus.
If I were reasonable, I would go back to GIANT ENEMY CRAB 2. I have a drawer full of components, already own the electronics and motors, I have the start of a design, a decent blueprint for next steps. The problems I am facing aren't unsurmountable. But I have a really bad case of Shiny Toy Syndrome.
Well last night, something funny happened. I had set aside a block of time to watch some Fusion360 tutorials and learn how to properly use my tools, but the Silver Spark shortage kept bugging me. I could order everything except the motors and wait for parts to restock, or I could order equivalent motors separately from Aliexpress and mate them with the Fingertech gearboxes, but it was all so inconvenient, and it would be easier to shelve the (basically complete) project until the supplier got a new batch of motors. But something on the website caught my eye.
For a long time I've dreamed of making a "shuffler" bot, as a stretch goal to test my engineering skills. Additionally, I recently learned that there is a local tournament coming in a few months that allows for a shuffler weight bonus. I resolved to build a bot for their Plastic Antweight class, since it seems to be the most active. Plastic Antweight is a special 1lb weight class where the chassis and weapon must be made of easily 3d printed materials, like PLA, ABS, or PETG. It creates an easy entry point for new builders who don't have the means to create metal weapons or armor. The original GIANT ENEMY CRAB was made for this class, with its weapon and armor being made of PETG.
So anyways, shufflers. Under certain rulesets, combat robots that eskew wheels in favor of cam-operated "legs" can get a 50% weight bonus to account for the complexity of this drive system. It's a classic challenge for builders, designing a robut shuffling drive system that is light enough to take advantage of the weight bonus. Some bots like NHRL's Silent Spring or Son of Whyachi from the classic Comedy Central series have used this weight bonus to great effect. At the 1lb weight class, that's only an extra 226ish grams - hard to take advantage of given how much more shufflers weigh than wheels - but there are other ways to make use of that weight.
My first thought was a defensive control bot similar to Plum Blossom. Use my 1.5lb bot to push around opposing 1lb bots until the pit opens, then push them in. I won't have as good traction as wheels, but will be much heavier than the opposition. After a little thought though, that seemed a little boring. I thought about what kind of active weapon would be easy to add to the robot, and settled on a vertical drum spinner.
Vertical drum spinners use a wide cylinder with teeth, spinning upwards to uppercut opponents. Bots like Minotaur and Shreddit Bro have shown that a fast-spinning compact mass can deal ample damage to opponents. Additionally, since I am building this for the Plastic Antweight class, I can make the whole drum out of a big single solid chunk of plastic, simplifying construction.
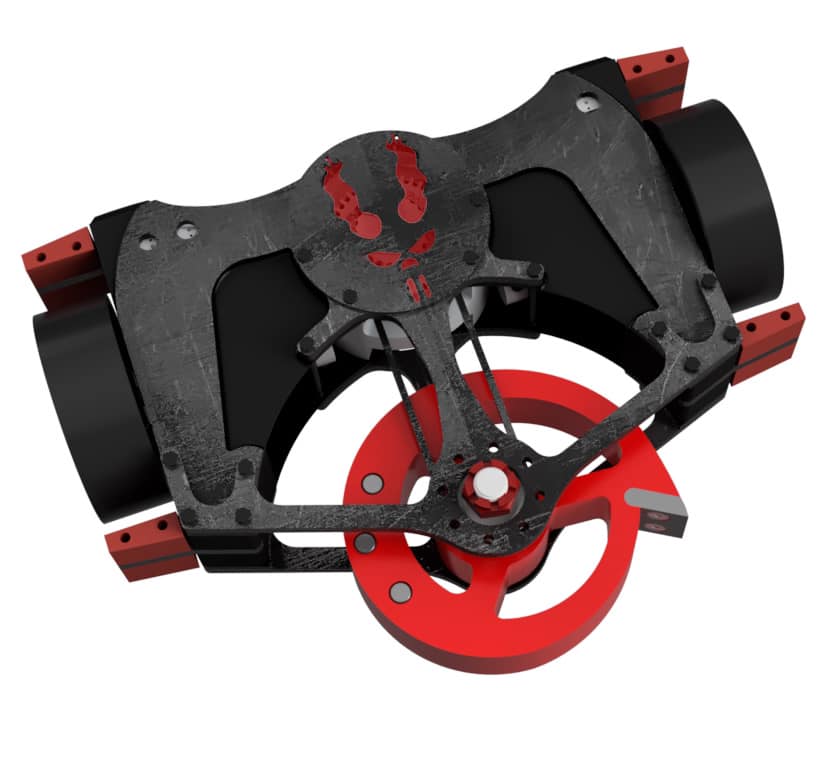
Back to shufflers and how they work. Shufflers work by turning rotational movement into linear movement with a camshaft, often using belts or gears to give the shuffling legs multiple points of connection with the chassis. Basically, offset circles rotate on a shaft in sync with each other, and those cause the legs to rotate forward to walk forward. My design uses 4 legs on each side to stabilize this movement by having a set of legs on the ground every quarter rotation. At all times there will be a leg at the North, South, East, and West, looking from the side. The legs will be supported on the front and rear, with the front support cam being connected to gears driven by the rear motor.
Now this mechanism is pretty heavy, so I want some strong motors to drive it. A set of four Silver Sparks as in Plum Blossom would be good, but then I would hit the same stocking problem. Looking at what the supplier does have in stock, I find these. Fingertech MegaSparks, big ol' brushless motor mated to a gearbox, designed for 3lb bots. My bot has a complicated drive system, but it's only half that weight. I order two of them, paired with appropriate electronics and mountings. They should be ENOUGH.
A feverish night of drunken bot design, much of which I don't really remember, and I come up with this monster. Two four-legged shuffling mechanisms powered by oversized motors, with my last spare MT2204 brushless weapon motor up front driving a 40mm drum that has yet to be designed. The legs still need some refining (more grip where the leg meets the floor), and the cams could certainly use some speed holes. And it needs a weapon to replace the smooth cylinder it currently spins. After that it's minor issues like attaching the lid and positioning the switch and stuff. I'll also probably replace the PID (big board up front) for a more compact power switch, and use a smaller battery to keep under weight.
More importantly though, it needs a theme. This is the first bot I've made, where I don't even know what I want to call it. It's big (50% bigger than most competitors), it shuffles forward, and it uppercuts like other drum spinners. It will be made of PLA or ABS, so the parts could easily be any combination of colors, but I don't know what to do. The bf suggests "Jitterbug" for the shuffling motion, but I'm open to names. What should I do to make this bot pretty?
106
So it's been a bit since I posted an update on my GIANT ENEMY CRAB 2 project (Part One and Part Two), and that's because I have both run into some difficult questions about how I want to design its weapon system, and also because I got some brand new waterjet-cut metal parts from SendCutSend! Now with titanium armor and an AR500 steel weapon, my other bot-in-progress JACKALOPE is just a set of wheels (and maybe a new lid) away from being a fully-functioning combat robot. This is definitely the most dangerous thing I have ever designed and I'm a little nervous about the weapon test once I get these last parts on.
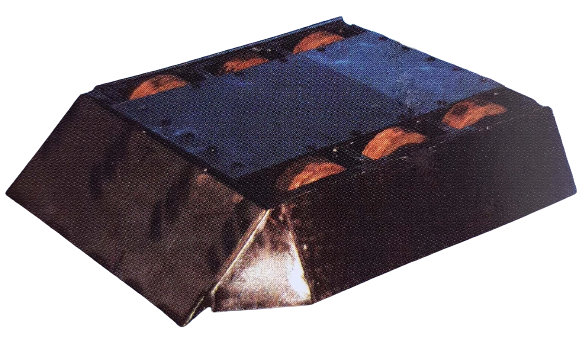
Anyways, to help keep myself active while I decide what I'm doing with GEC2's weapon, I've decided I am going to start on another project - a simple Wedgebot. Wedgebots are the simplest form of combat robot - an armored wedge or plow being pushed around by a robust drive system. Examples include the original La Machine from old-school BattleBots, Storm 2 from Robot Wars, Original Sin and Crash n' Burn from Robogames, and arguably certain iterations of Duck! from the BattleBots reboot. It's a surprisingly effective strategy, breaking your opponents with your face. In fact, many attribute the fall of classic Comedy Central era BattleBots to there being way too many wedge-vs-wedge matches, which usually aren't very fun to watch. In lower weight classes however, Wedgebots are very common and new builders are encouraged to start with them since they are much safer than a bot with an active weapon. They are also very common for beginner kits like the Fingertech Viper, and the Botkits 1lb Candy Wasp and 3lb D2.
My bot will be very much in line with the Botkits bots - 4 wheel drive using 4 motors, with a separate wedge up front. It will be 1lb like the Candy Wasp, but with a 3d printed TPU chassis (flexible and strong) and aluminum motor mounts, instead of being all billet aluminum. I also have a different wedge design in mind that I think should allow it to function upside-down, unlike the Candy Wasp.
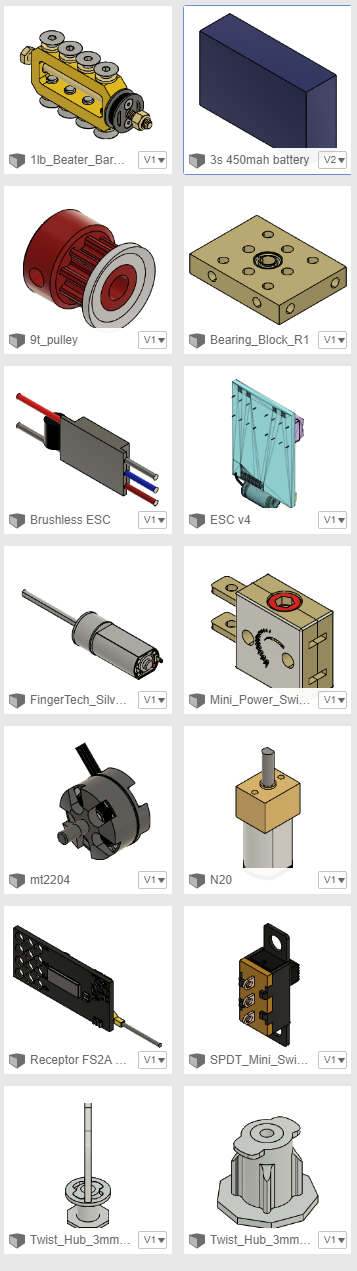
Anyways, to start on this design, I open up Fusion 360 and start pulling parts from my saved parts library of common bot parts that I have been collecting, and arrange them on the workspace. I don't need to worry about any pulleys or weapons or anything so it's pretty simple.
For this bot I will be using:
- 4 Fingertech Silver Spark Gearmotors
- 2 5A Brushed ESCs (1 for front drive, one for rear)
- 1 Fingertech Mini Switch
- 1 FS2A 4 channel receiver (each drive ESC takes 2 channels, so this is perfect)
- 1 3S 450Mah Lipo battery
- 4 Fingertech bearing blocks to mount the motors
- 4 Fingertech 3mmx.75" wheel hubs to mount the wheels
- 1 pair of terminal blocks (not pictured)
Arranged on the workspace they look like this.
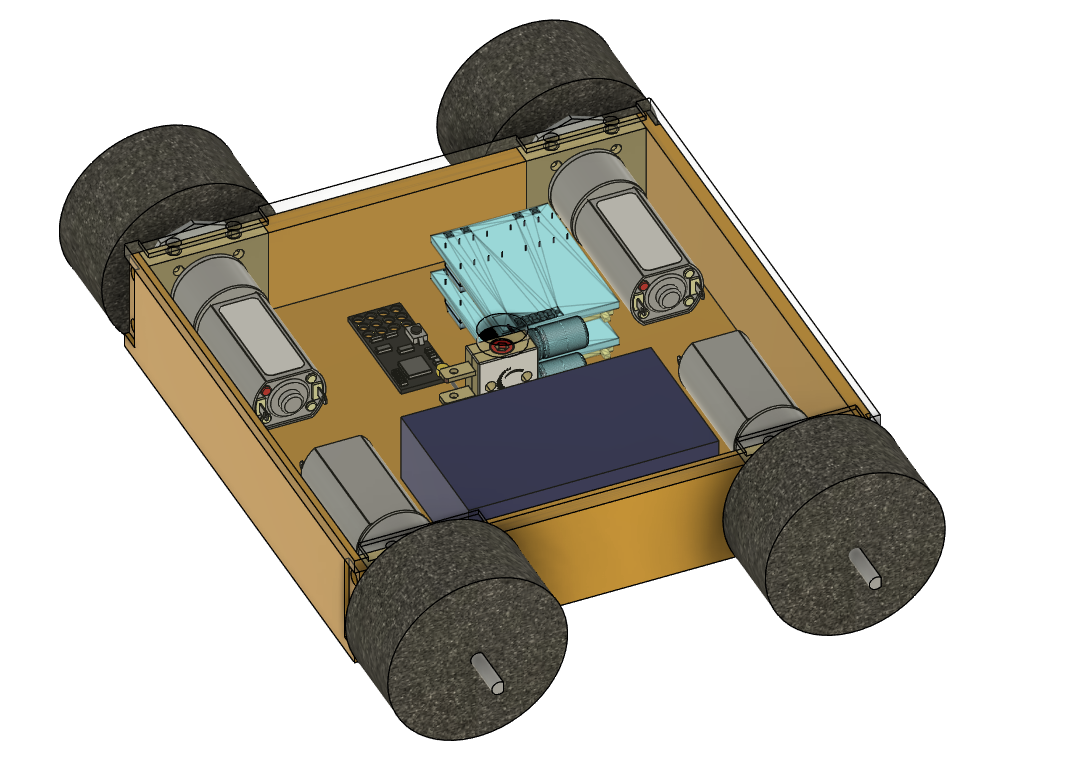
Next step is to build a quick little chassis around these components and give it some wheels. 3mm walls and floor, 1.5"x.75" wheels, a couple more adjustments to add mounting holes for the bearing blocks, and pop a lid on top, and it turns into something like this.
Now on its own, this is a fully-functional boxbot. Defenseless and underweight, no obvious way to tell which side is the front, but it will drive. My next step will be to design the wedge mounting system, and maybe some internal walls to hold all the electronic components in place. My next post will likely be about that, and maybe getting some wheels on JACKALOPE so I can take a video of how it works. Or maybe I'll have a breakthrough on the crab again, who knows?

107
108
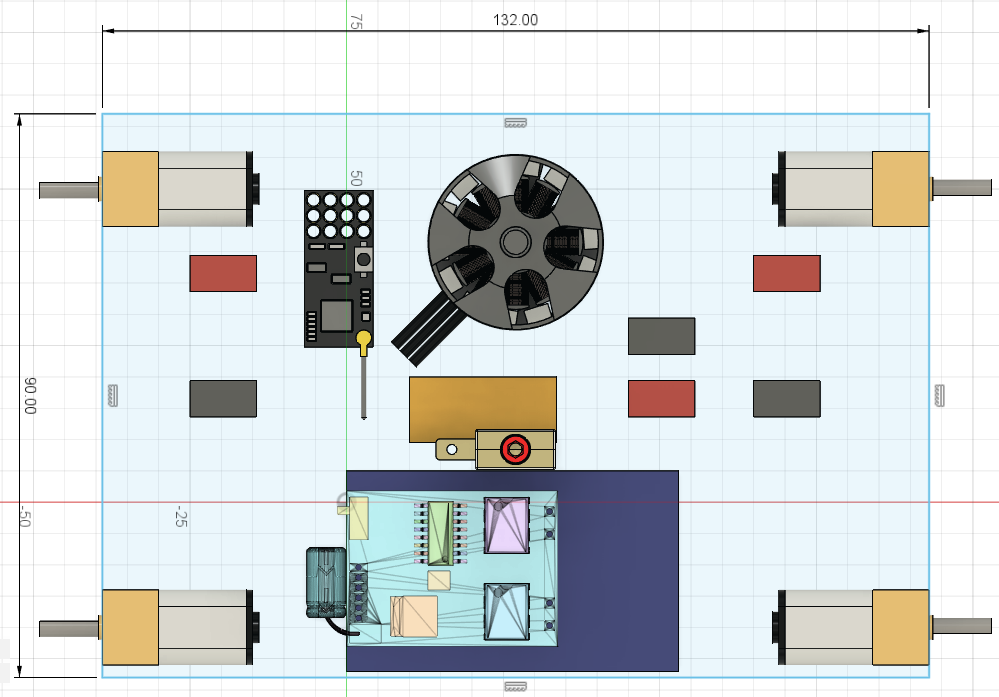
Where we last left off, I explained the components and basic design ideas behind GIANT ENEMY CRAB 2, one of the antweight (1lb) combat robots I am currently designing so that my bf can compete alongside me at the next tournament. It will be a four wheel drive horizontal spinner, with a wide "crab-like" aesthetic.
Going off of my previous post, here is the wiring diagram, drawn on paper and then visualized in Fusion360.
I love Fusion360 as a design tool because it not only allows me to draw and extrude 3d parts, but has the ability to import components that other people have helpfully modeled and uploaded to community libraries for me to use. As you can see here, the motors, receiver, switch and drive ESC are imported models, while the battery, weapon ESC, wheels, and terminals were all drafted by me knowing their dimensions. This ensures that everything will fit properly in the design, with all the screw holes in the right places, etc.
I have arranged the components in a fairly compact fashion, so the next step is to start building the chassis around them. I start with a 3mm floorplate, with holes to mount the MT2204 brushless drone motor to it. This motor will use a pulley system to drive the spinner up front. I have also added 1.5d"x0.5w" wheels onto the drive motors, and adjusted the height so that the robot will have just a couple millimeters of ground clearance. The Ground Game is super important in robot combat, where most of your opponents' strategies will start with getting underneath you. I don't want to scrape the ground with the bot's belly and risk ending up high-centered, but I want to be as low as I comfortably can on the flat wooden arena floor. Initial Chassis
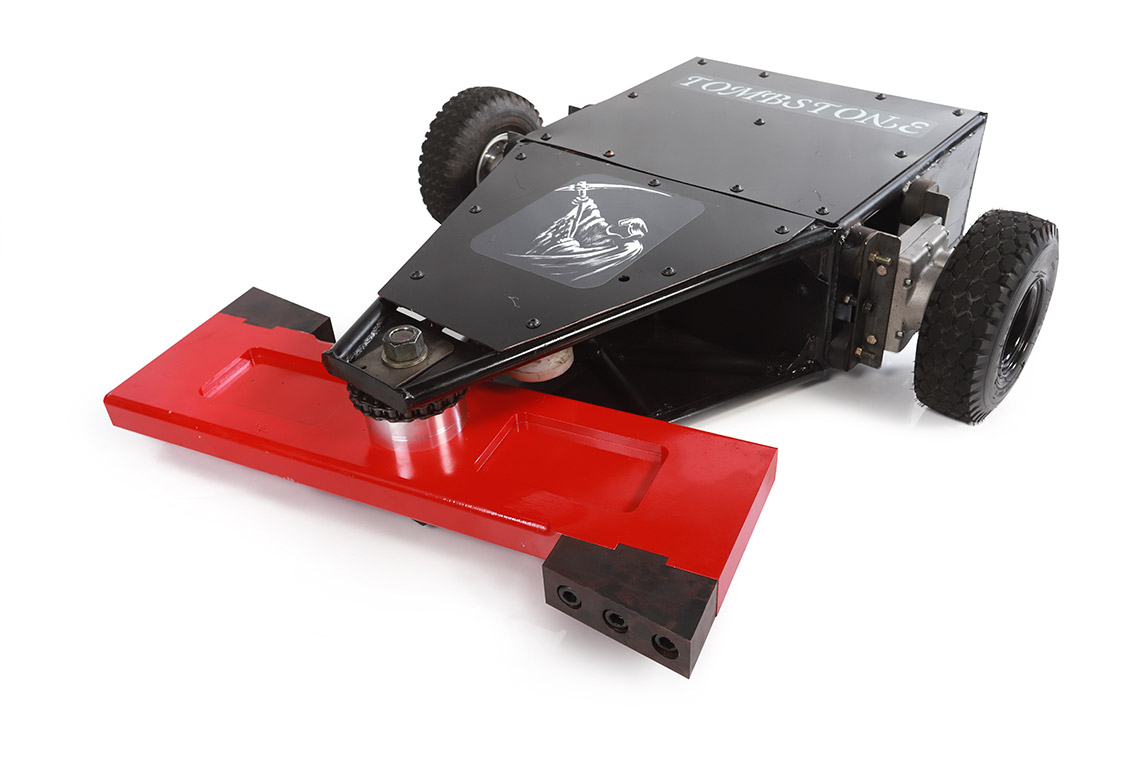
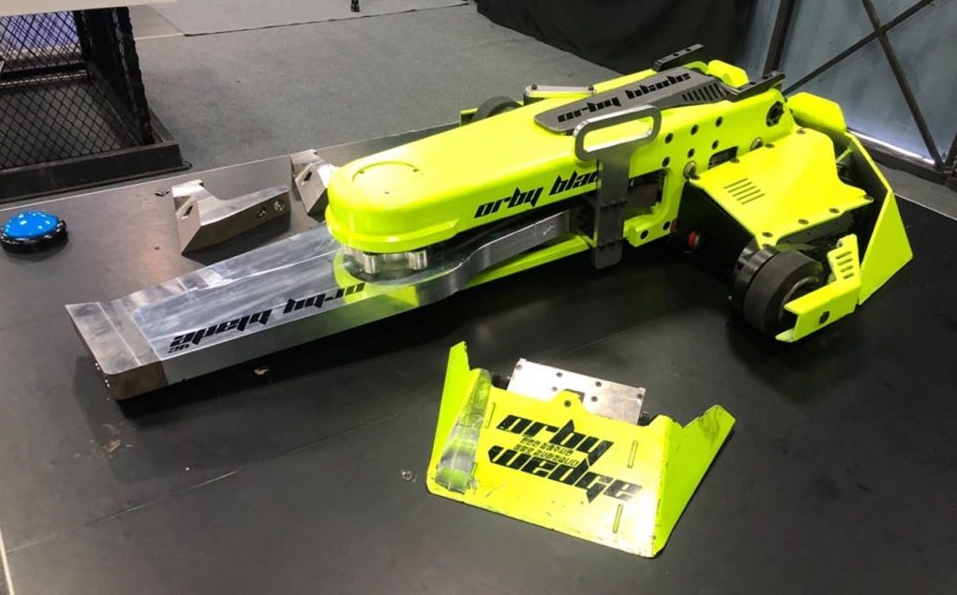
At this point I discover I have made a critical mistake! With the current positioning of the weapon motor and battery, I'm left to either use a very small-radius weapon, or to place the weapon far far in front of the bot, which would throw off my desired weight distribution. "Normal" two-wheel-drive horizontal spinners like Tombstone or Orby are fine having a big weapon way up front and using the weapon shaft as a third "wheel" to balance on, but with this four wheel design, I want the weight distributed among the 4 wheels, with the weapon supported by the whole bot. This will allow me to avoid the friction of the weapon shaft on the floor and hopefully improve the bot's pushing power, which is traditionally a weak point to horizontals.
To solve this problem, it was as simple as repositioning the battery, drive ESC and switch to the sides, and allowing the weapon radius to spin deep within the chassis like with the original GIANT ENEMY CRAB.
So here is the new layout for GIANT ENEMY CRAB 2, with the electronics moved to the sides and the chassis widened 40mm to accommodate a larger weapon. The two circles represent potential weapon radii. The smaller circle is 100mm diameter with the center at the front of the current chassis layout, and the larger is 125mm, moved forward 25mm.
Combat robot spinners in this class usually sit around 60g or so. My other bot JACKALOPE accomplishes this with two small disks side by side for a short, punchy weapon, but for this bot I will design a single-piece weapon with as long a reach as reasonable without throwing off weight balance. My current thinking is that I can get good use out of the 100m weapon combined with some other top secret design features I had in mind. So I cut that radius out so that I can have a good visualization of where the electronics will all fit. So here is the floor of my chassis, which will contain all of the important guts.
The original GIANT ENEMY CRAB was partially inspired by Malice and similar bots, and that resemblance is coming through pretty strong with this silhouette so far.
So Wow, this is a lot of words to say "I made the robot's floorplate, except for the weapon part", but it's mostly downhill from here. Next I just need to add some walls and a roof, design a spinner, figure out how it will fit onto the chassis, and hammer out any problems that come up before printing and assembling. Out of these steps, I think I will have the most fun designing the weapon, with the following parameters:
- Weighs approximately 60 grams
- Fits inside a 100mm diameter
- Asymmetrical, with a single striking point for maximum bite
- The hard part: it has to be balanced, so that it doesn't spin itself apart
Next up: The one where spring_rabbit cries to herself softly while running the "center of balance" algorithm for the squillionth time.

109
110
*Pictured: the original GIANT ENEMY CRAB and work in progress JACKALOPE *
I will be linking parts I use as examples. They are not necessarily recommendations for parts or suppliers, I just want you to see what I'm talking about.
Hey sickos, spring_rabbit here, that weirdo who keeps posting about BattleBots. I thought this com could use some more long content, so I'm going to do a build blog of my next combat robot project here. In this post I will be introducing the GIANT ENEMY CRAB 2 project and talking a lil bit about the electronic components I will be using, and I will document future work on the robot as well to keep track of its progress.
PART 1: INTRODUCTION
In the winter of 2021 I finished building my first fully-functional combat robot, GIANT ENEMY CRAB. GEC is a 4 wheel drive robot with a horizontal spinning hammer up front, driven by a drone motor inside the chassis. It weighs just under 1 pound and uses simple 3d printed materials to comply with my local league's "Plastic Antweight" division. The chassis and weapon are made of PETG (one of the few materials allowed in the Plastic Antweight class), the tires are cheap foam wheels I found online, and it uses a hair tie for a weapon pulley belt. It's bulky, ugly, the wiring job sucks, and while the hammer could easily break your finger once spun up, it doesn't do a ton against similar opponents. But it was my first robot and that is something special.
Since last winter though, I've learned a lot. My other antweight JACKALOPE is coming along nicely and a quick glance shows how much more compact and efficient I can get with my designs. So with much more experience under my belt, I'm looking to build a new version of GIANT ENEMY CRAB, using better materials and more knowledgable design to make a much more competitive bot. Unlike the original, GEC2 will be made for the standard 1lb Antweight division, allowing much more flexibility in materials I can use, including engineering filaments and laser-cut metal parts. This is at the request of its future driver, who wants to compete alongside me in the more destructive 1lb weight class.
So what will make GEC2 a proper successor to the original GEC?
- It will retain the wide 4wd horizontal spinner design.
- Same electronics (mostly), with better hardware, design, and materials.
- Angery eyes - so angery
- Crab
PART 2: ELECTRONICS
The electronics used in GEC2 will be the same as in the original GIANT ENEMY CRAB, save for some upgrades to the battery and power switch. This is because I bought multiples of each of the original components and don't want them to go to waste.
Like most small combat robots, GEC2's electric components will consist of a Battery, Brushed motors for drive, a Brushed Electronic Speed Controller (ESC) to control the drive motors, a Brushless motor for the weapon, a Brushless ESC for the weapon motor, a Receiver, and some switches and terminal blocks. Each of these parts are pretty typical for the weight class, but I will break each of them down here.
Battery - The original GEC used a 2S 300mah battery. It works, but that size of battery is more commonly used for 150g fairyweight/British antweight bots. I will be bumping it up to a 3S 450mah battery which is much more common for this weight class.
Drive Motors - Much like the original, GEC2 will be using 4 1000rpm N20 micro gearmotors to drive it. These are a little small for the weight class, but using 4 of them is enough to carry 1lb just fine.
Drive ESC - The big choice with drive ESCs is whether you want to have a separate ESC for each motor, or one that drives both of them. Dual ESCs are really convenient and cheap, but also bigger and thus a little harder to fit into your design. This is the one I use. In my experience it will run the 4 small motors just fine if I assign two motors per drive channel, and it has a similar footprint to the battery which makes designing an enclosure easier.
Weapon Motor - The weapon will be driven by a MT2204 drone motor. I don't actually like the mounting system on these and prefer a thinner shaft and top that you can screw into, but they come in sets of 4 and I've only used 2 so far. Next time I'm buying parts, it's something I will look out for.
Weapon ESC - The weapon motor will be driven by a 20A Brushless ESC. Again, these came in sets of 4 when I bought them, but unlike the motors I have no complaints. These make the motor go spinny!
Receiver - I like this receiver. I'ma be real, I don't know anything about receivers, but this one is compatible with my transmitter (controller) and has enough channels to run this bot so I see no need to change things up.
Switch/Terminal Blocks - In the original GEC I used a tiny spdt switch to power it on and off, and all of the wire connections are horrible tangles of badly-spliced wire. This time, I will be using a Fingertech switch, and terminal blocks for all 3-way connections. These are mostly for convenience sake as I don't think there is any reason I couldn't do things the old way. I just like these way more for ease of construction and repairability.
So nothing too special as far as electronics go. These are mostly just what I had on hand, and very typical of 1lb bots. Mostly the same as in the original GIANT ENEMY CRAB but with better battery, or like JACKALOPE with different drive motors. The real magic of bot building happens when you start to put a shell around it all...
NEXT: Let's open up Fusion 360 and build a first draft chassis!
update: the wiring diagram update 2: Preview for what I'm doing next

111
Couldn't decide if this belonged in c/diy or c/sports.
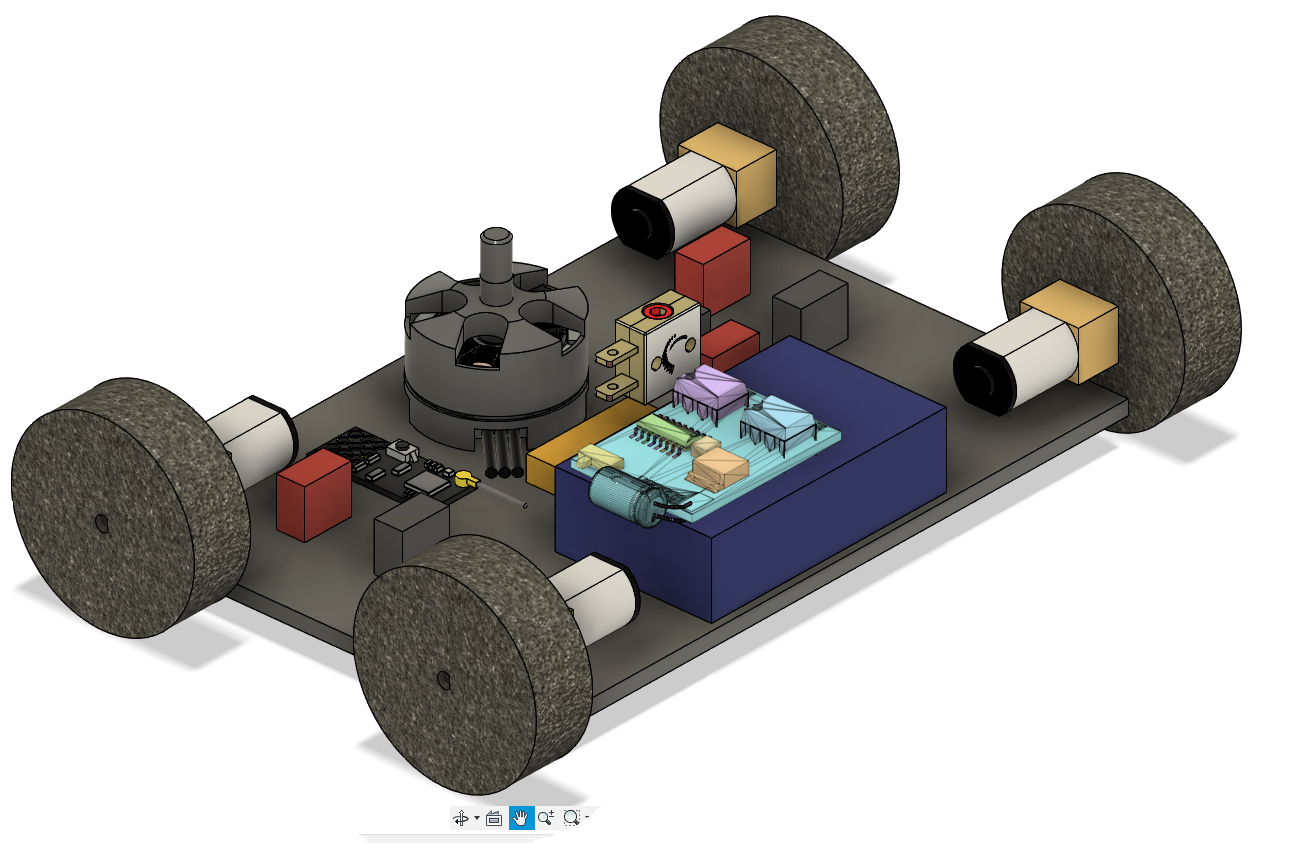
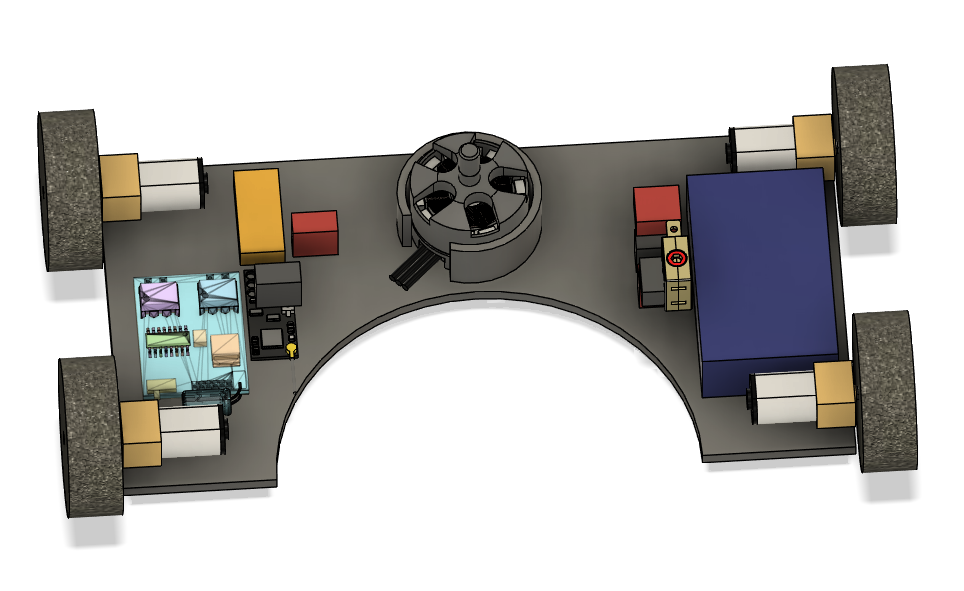
This is a 3d model I made in Fusion360 of the 1lb combat robot I am working on, hoping to take to local competitions once I have a good roster across weight classes. The wheels are foam, the chassis and lid are 3d printed TPU95a (strong and flexible), with titanium armor and AR500 steel weapon discs. The pulleys and wedge mounting are in carbon fiber nylon because I think I want those to be stiffer. The electronics are pretty typical for a bot of this size - Fingertech silver spark motors and connectors, generic speed controllers/receiver and a 2204 brushless drone motor to power the weapon, powered by a 3s 450mah lipo battery. Not pictured are the blue aluminum hubcaps on the wheels (Fingertech hubs), wheel pulleys, or the timing belts driving the weapon and front wheels. It is about 220mmx120mm without the forks or long wings of the wedge, and 60mm at the top of the fingers.
As a 4 wheel drive vertical drisc (drum disc) spinner with a wedge and forks, this is basically a scaled down version of the "meta" heavyweight battlebots like Hypershock or Witch Doctor. Which makes it pretty behind the curve in creativity at this weight class but it's a classic design so I wanted to have at least one. For people unfamiliar with the sport, the discs up front spin upwards super fast, I drive into the enemy using my wedge and forks to get underneath them for a solid hit, and then the discs smack the opponent upwards. That's the idea, anyways.
Bot needs a name though. It's been through several iterations and temporary names like "Mourning Star" (after a cool racecar from an RPG I was playing at the time) and "Finger Maiden" (Elden Ring, referencing the two "fingers" that allow the bot to continue driving while upside-down), but now I feel I'm just about at the finish line and should settle on something good. Anybody good at naming things? Thoughts/questions about the design of the bot?
All that is left to do is print and assemble it, then adjust the weapon and armor to account for however much weight I have remaining.
112
113
114
116
117
118
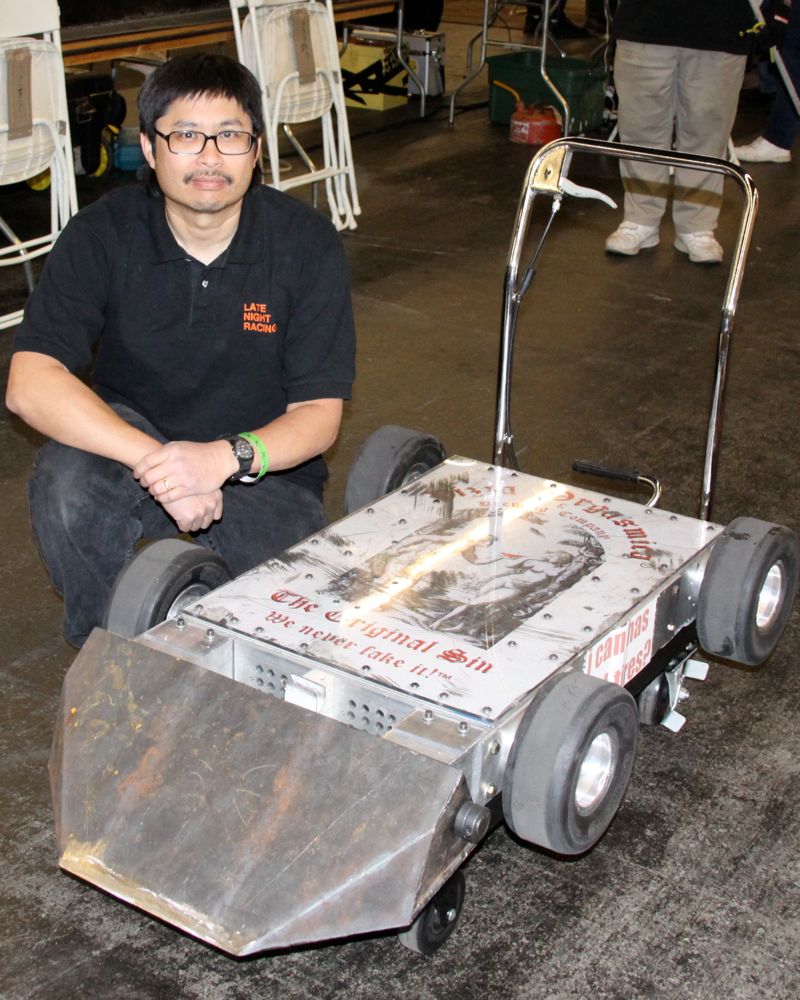
I like to play flight sims, and a rudder pedal is a pretty important accessory to me. The problem is that the ones that are available to purchase are either prohibitively expensive or they're designed to be thrown away when they fail.
Well, after throwing away my second set of pedals, I decided to design my own. Serviceability is my primary design consideration. Having to change out a potentiometer every couple hundred hours of use is a non-issue if the process to do so takes 10 mins from start to finish.
The pedals operate as an accessory to the throttle controler (TWCS T.1600M) that was part of the set the original pedals came with. The throttle has a rj12 connection on it that allows it to connect several additional axis's. So I'm just feeding the potentiometer directly into that jack, letting the throttle controler figure it out, and then assigning it an axis in game. I will eventually replace the throttle interface with my own onboard Arduino controller but that's a different project for a different day.
I originally tried to use a small rotational dampener I scavenged from an industrial cabinet that had soft close drawers. But it didn't give me enough resistance, so I added the cheapest motorcycle steering dampener I could find. Now it has great feel. The only drawback is that it doesn't self center, but that's a feature since I primarily fly helicopters.
The parts bill was around $70~
Additional pictures: https://hexbear.net/pictrs/image/Y8El3K71hp.jpg

119

121
It's Robot Fighting Time!
Remote Control Robot Combat is a sport where competitors build remote control vehicles, generally with armor and weapons, which then fight against each other in a walled-off arena. It’s a competition based on good design, good construction, and good driving, with all three necessary to succeed in any given competition.
Remote control robot combat traces its lineage back to 1987's Critter Crunch, organized by the Denver Mad Scientists Society at Denver's MileHiCon, conducted on a hotel table which competitors were forbidden from damaging. This ad-hoc competition began a sport that quickly took off across the world, particularly in the Anglosphere (but not exclusively! Brazil, Russia, and China also have vibrant scenes, and India and Pakistan have begun making their way into international competitions). The sport got a big publicity boost in the 90s with the airing of Robot Wars in the UK, and later BattleBots in America, which became the two premiere televised leagues each with their own peculiarities and rule differences.
While Robot Wars has been cancelled, uncanceled, and cancelled again, BattleBots still airs a yearly competition on Discovery Channel, where teams build 250lb machines with hammers, spinning blades, flamethrowers, and other weapons to fight for the coveted Giant Nut. Gone are the hotel tables and ad-hoc rules - over the last 35 years the rules, technology, and metagame has evolved into a stiff competition where teams will put thousands of dollars and man-hours to make sparks fly in the BattleBox.
Don't have thousands of dollars or big business sponsorships that will pay for your bot? While the 250lb heavyweights suck up most of the attention, robot combat happens at many weight classes, with hobbyists also competing at the 150 gram, 1 pound, and 3 pound leagues, with the biggest "insectweight" league being Connecticut's Norwalk Havoc, where 3lb beetleweight robots fight over the course of a weekend, streamed on YouTube for all to see. There are also 12lb and 30lb leagues, but I don’t know enough about them to speak confidently.
New competitors will often start with a robot kit, such as a Fingertech Viper for the 1lb “antweight” class or a BotKits D2 for the 3lb “beetleweight” class. These come with essentially everything needed to compete minus the transmitter (controller), and you can expect to see several of them during any large open event. Of course, if you have a 3d printer and know what parts you need, it can be much cheaper to roll your own. I estimate that an average 1lb bot costs me between $100 and $200 in parts and spares, but that number can increase rapidly with different weight classes or if I get too creative with exotic materials (I love titanium!).
I could talk about robot combat all day, but instead, here are a couple classic fights from each of the major franchises, showing many of the different weapon types you might see in these competitions.
🪚 Carbide vs Eruption 🌋 (Robot Wars 2017)
🔨 Shatter vs End Game 🥝 (Battlebots 2020)
🐸 Polywog vs Silent Spring 🍃 (NHRL 2022 3lb, both drivers also pilot BattleBots heavyweights Ribbot and Sawblaze, respectively)
Announcements & Information
Megathreads and spaces to hang out:
- ❤️ Come listen to music with your fellow Hexbears in Cy.tube
- 💖 Come talk in the New weekly queer thread
- 🧡 Monthly Neurodiverse Megathread
- 💛 Read about a current topic in the news
- ⭐️ May Movie Schedule ⭐️
Reminders:
- 💚 You nerds can join specific comms to see posts about all sorts of topics
- 💙 Hexbear’s algorithm prioritizes struggle sessions over upbears
- 💜 Sorting by new you nerd
- 🌈 If you ever want to make your own megathread, you can go here nerd
Links To Resources (Aid and Theory):
Aid:
- 💙 Comprehensive list of resources for those in need of an abortion -- reddit link
- 💙 Resources for Palestine
Theory:

122
A few weeks ago I made a post about some basic sewing/mending skills and supplies so people could make their clothes last longer. I've been thinking about some things to write for Part 2, so here it is. As before, if other crafty people have more to add, please feel free!
@hotcouchguy asked about best practices/basic stuff that he missed while teaching himself how to sew, so I've been trying to think about stuff that you do without even really realizing you do it, and I thought of something that is really useful when you're hand sewing. I shared this link to show you guys how to backstitch, but I didn't point out something that she does in the video that is really useful, especially if you want to work quickly. You may have noticed that while she's sewing, she doesn't pull all the thread to the back, then pull all the thread to the front. Instead, she pushes her needle to the back and back to the front kind of in the same motion, which leaves most of her thread in the front. Then she pulls the whole thing through to the front again until her stiches are taut. Now, if you're new to sewing, it might seem a little tricky to send your needle to the back and back to the front again all in one motion like that, so you might want to break it up into two separate motions, which is fine! The one thing I would suggest though is to leave a loop of thread on the front. So you would send your needle to the back and pull through some of the thread, but leave some on the front still, then send your needle to the front and pull the whole thing taut. The reason for this is that it's easy for thread to get twisted up while you're working and make a little knot--these knots are often not very sturdy, so they come loose. If you've got a knot like that and it comes loose after you're done, all of a sudden your nice taut seam has turned into a loose mess. This leaves you needing to check the back constantly to make sure there aren't any sneaky little knots hiding back there, which is a pain. If you leave a loop on the front and then pull the whole thing taut, then you can see that there must not be a knot back there otherwise the front loop wouldn't move, so that way you're not constantly flipping your work to check the back. (I'm not sure if all this only makes sense to me because I know what I'm trying to say. Please let me know if any of that needs clarification. It's so much easier to just show people than try to talk through it!) If your thread does get twisted and makes a knot, usually pulling gently will untangle it. If it's being stubborn, insert your needle through the loop and pull away from the fabric and it should come undone. This video shows that method, and how to untwist your thread periodically by letting your needle dangle. She's embroidering, but it's the same idea. (Sorry, this video is a little cheesy. The methods are sound though!)
I also realized I didn't tell you guys the technique I use when using the backstitch to mend a hem that's come undone. It doesn't happen as often now, but for a while it seemed like every t-shirt I bought, the bottom hem would start to unravel after a few washes. This is what I did to fix it. Snip the loose threads off right next to the fabric so you don't have any tag ends hanging loose. Thread your needle, and start stitching about an inch from where the original stiches stop, stitching right over the machine stitches, using the same holes in the fabric. This is enough to hold them in place and keep the hem from unraveling more, even through many washings. Then keep backstitching through the area that came undone, and keep stitching over the stitches on the other side, again for about an inch. This is a good moment to point out that a stitch in time saves nine! The more quickly you do this, the less area you'll need to fix. You may still be able to see the holes for the original stitches too, which will help you keep your stitches uniform and help the whole thing blend in. If you've let things go, especially if you've washed the garment since it started to unravel, then you probably won't have that guidance any longer. If it's a big area, you might want to iron your hem so that you're not working to keep the hem straight. Some pins will help with that too. Then knot the thread (there's a section on that in Part 1). Note: Hems don't typically have a lot of pressure on them so in my experience, you don't need to bother with trying to knot off the machine stitches to keep them from unraveling. However, if it's a seam that's come undone--like if you've split the seat of your pants or something--there's going to be more pressure there. You might want to unravel enough of the machine stitches to have enough thread to work with to knot it, then mend the open part. I don't like trying to knot machine stiches though and I don't like unpicking stitches, so as I recall I've just backstitched farther over the machine stitches--like instead of 1 inch, 2 or 3 if it was an area that was going to be under pressure.
How to thread a needle: (How did I skip this before??? I mentioned using a needle threader if you're having trouble, but that's it. Whoops!) This is how I do it. She mentions that saliva is bad for your thread. True! (I have done it though.) There's also beeswax, which I linked to in Part 1 if you want to stiffen your thread and try to just push it through. I think the loop method above works pretty well though. If you want to cheat 😁 and use a needle threader, here's how to do it. (No shame, I have one and use it sometimes when I'm struggling for some reason.)
Fix a snag in a knit: This tool is a nifty little thing that you can use to grab a snag in a sweater and pull the loop to the back so it isn't visible. It's very easy to use! There's a little latch that goes over the hook so that the hook doesn't snag on the fabric when you pull it back through. Insert back to front, open the latch, put the loop you're trying to hide between the latch and the hook, close the latch, and pull back through. The snag is now inside the garment where nobody can see it. Oh, here's a video if that didn't make sense. She mentions that she uses the tool for other stuff while sewing, and I do too. It's a pretty useful little gadget! One thing I use it for is if I haven't quite left myself enough thread to bury the end (See Part 1 on knotting off your thread) because if you don't have at least the needle's length of working thread left, you can't bring the point of the needle back near enough to your knot to make it work. This video is the only thing I've found that kind of comes close to explaining what I'm talking about. She's finishing off embroidery, but you can see that she's "burying" thread in a similar way. Skip to 1:40.
Mending a hole in a t-shirt: I don't like iron-on patches and prefer to use a needle and thread to fix holes, but that's just me--plenty of people like iron-on just fine. This video is nice because it shows you several varieties of iron-on patches, as well as how to sew it shut or use fabric glue. Like I said, I prefer the sewn method that she shows here, but you can see the range and make your own choices.
I talked about how to sew on a button in Part 1, but I didn't say anything about what to do if you don't have the original button to sew back on or a handy replacement in the hem for you to use. When that happens, take the garment to your local fabric store and see what your options are. You may get lucky and be able to find something similar enough that nobody will ever know the difference. If that doesn't work, you have 2 options--you can cut off all the other buttons and replace them all (not my preference), or remove the top button from the garment and move it to the missing spot, and pick out a deliberately different button to put in the top spot, so it looks like a fashion choice and not a bad match (my preference--I am lazy and don't want to replace all the buttons, but I'm also a perfectionist so if the match isn't close enough to really satisfy me then it'll bother me forever and I won't want to wear the garment.)
OK, that's all I've thought of for now. If anyone has a project that they're not sure how to approach or something that needs to be mended that you're not sure how to fix, please feel free to ask and I'll do my best to help you out. I enjoy this stuff, so it's no bother! (Also if you'd like to get into embroidery or crochet and you're not sure where to start etc, I'd be happy to talk needlecrafts too!)
*The header image is the scissors case I made for my embroidery scissors last summer, because I'm pretty proud of it lol.

123